Warning: mkdir(): No such file or directory in /var/www/vhosts/oneidatrail.com/httpdocs/app/plugins/photo-gallery/framework/BWGOptions.php on line 371
Blog - Page 5 of 6 - Oneida Trail
Menu

Tiny House Materials: Allocate to Accumulate

PJ, Collin, and I scoring a Big Window!

Counted my lucky stars this winter, and winter was one of them. The winter break allowed me to slowly accumulate materials at fantastic prices, get estimates on all material amounts and anticipated costs, and finalize The Oneida’s details. Having the final picture in mind has allowed me to backtrack and make tiny adjustments to set Michelle and I up for success.

Winter, Thank You

I was one of the few Syracuse residents not anticipating the end of winter.  Although excited to build, I loved the time to read through countless blogs, edit our plans, find awesome deals and salvaged materials on online, and secure funds for the build. I actually sold my car this winter for this project. I’m going all into this tiny house and simple living thang. I want to be personally off fossil fuels within the next two years. Getting Michelle off fossil fuels may be a different story! Wish me luck!

Salvaged Materials

Every salvaged material we find utilizes and converts a potential waste stream. When we find these materials, it reflects permaculture’s “there is no such thing as waste” principle. According to the World Watch Paper 124, “The average American house consumes about three quarters of an acre of forest and produces about seven tons of construction waste.” The amount of pounds of construction waste after a typical American house build is the entire amount of pounds used for a tiny house construction build! We actually scored some of that “waste” from a beyond huge American home.

If you have the option of delaying for a season to really hash out your design and slowly obtain materials, I highly recommend it. As an added benefit, you can become addicted to craigslist’s Materials page.  Shout outs to PJ, Pa, and my brother Collin for helping us get random materials throughout the season. I hope other tiny house builders also find what my mom calls–“deals of the century.”

“Deal of the Century” One: Mansion Leftovers

Michelle goes to school for Sustainable Construction Management at the State University of New York College of Environmental Science and Forestry, and she’s making some connections. One of those connections was her builder friend’s friend who had materials left over from a mansion build. To associate with a gigantic mansion built for two people feels dirty…but to exploit their waste feels extremely gratifying.

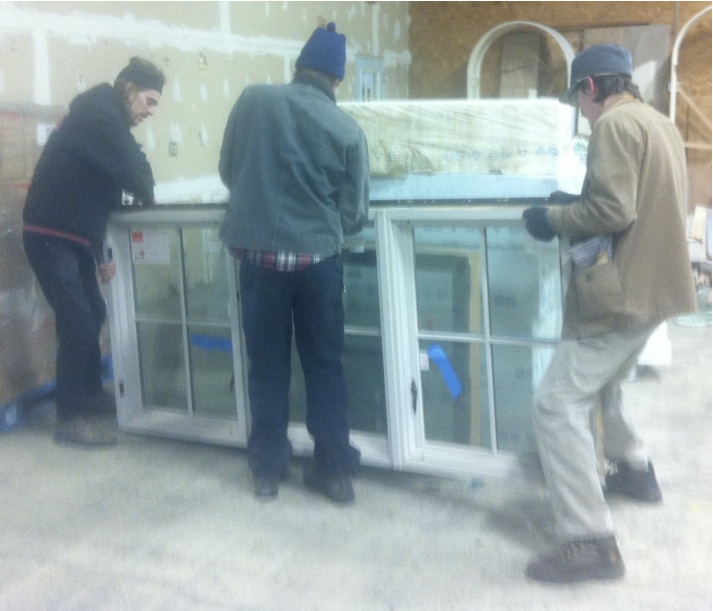
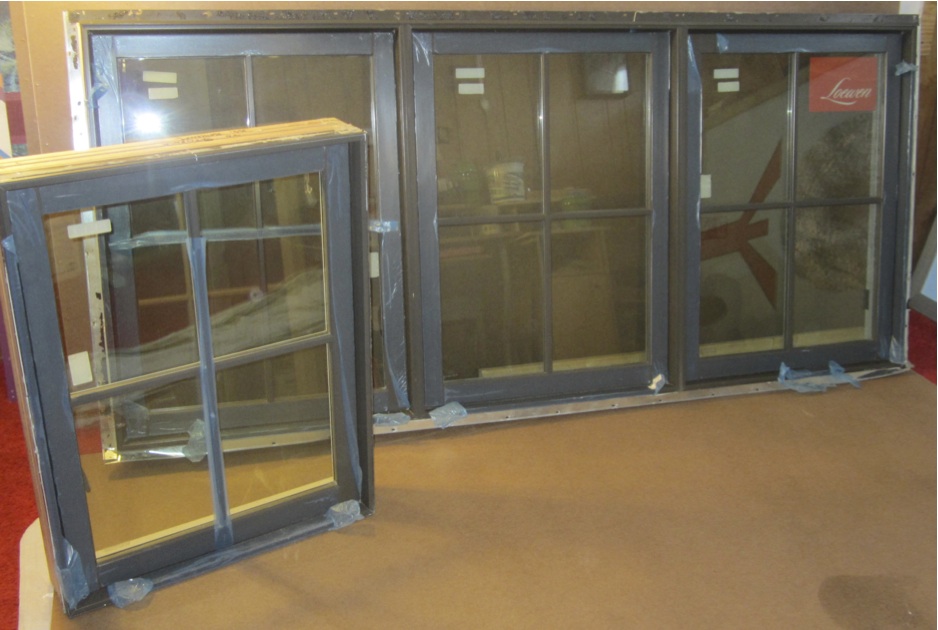
Simply stated, we scored around $9000 of materials for $600, which includes windows, foam insulation, and T&G interior pine siding. Some of these materials are high end; we would have never spent $6000 on six windows, but $200 for $6000 windows? Yeppers.

Windows: We secured triple glazed aluminum-clad wooden windows with brass hardware. There were five of them. These windows are top of the line, and they are heavy! I’m even a little worried if they might be too heavy. Maybe, I’ll try to resell them to purchase our companion studio trailer lipitor 40 mg. Is that wrong?

Heavy & Awesome Windows

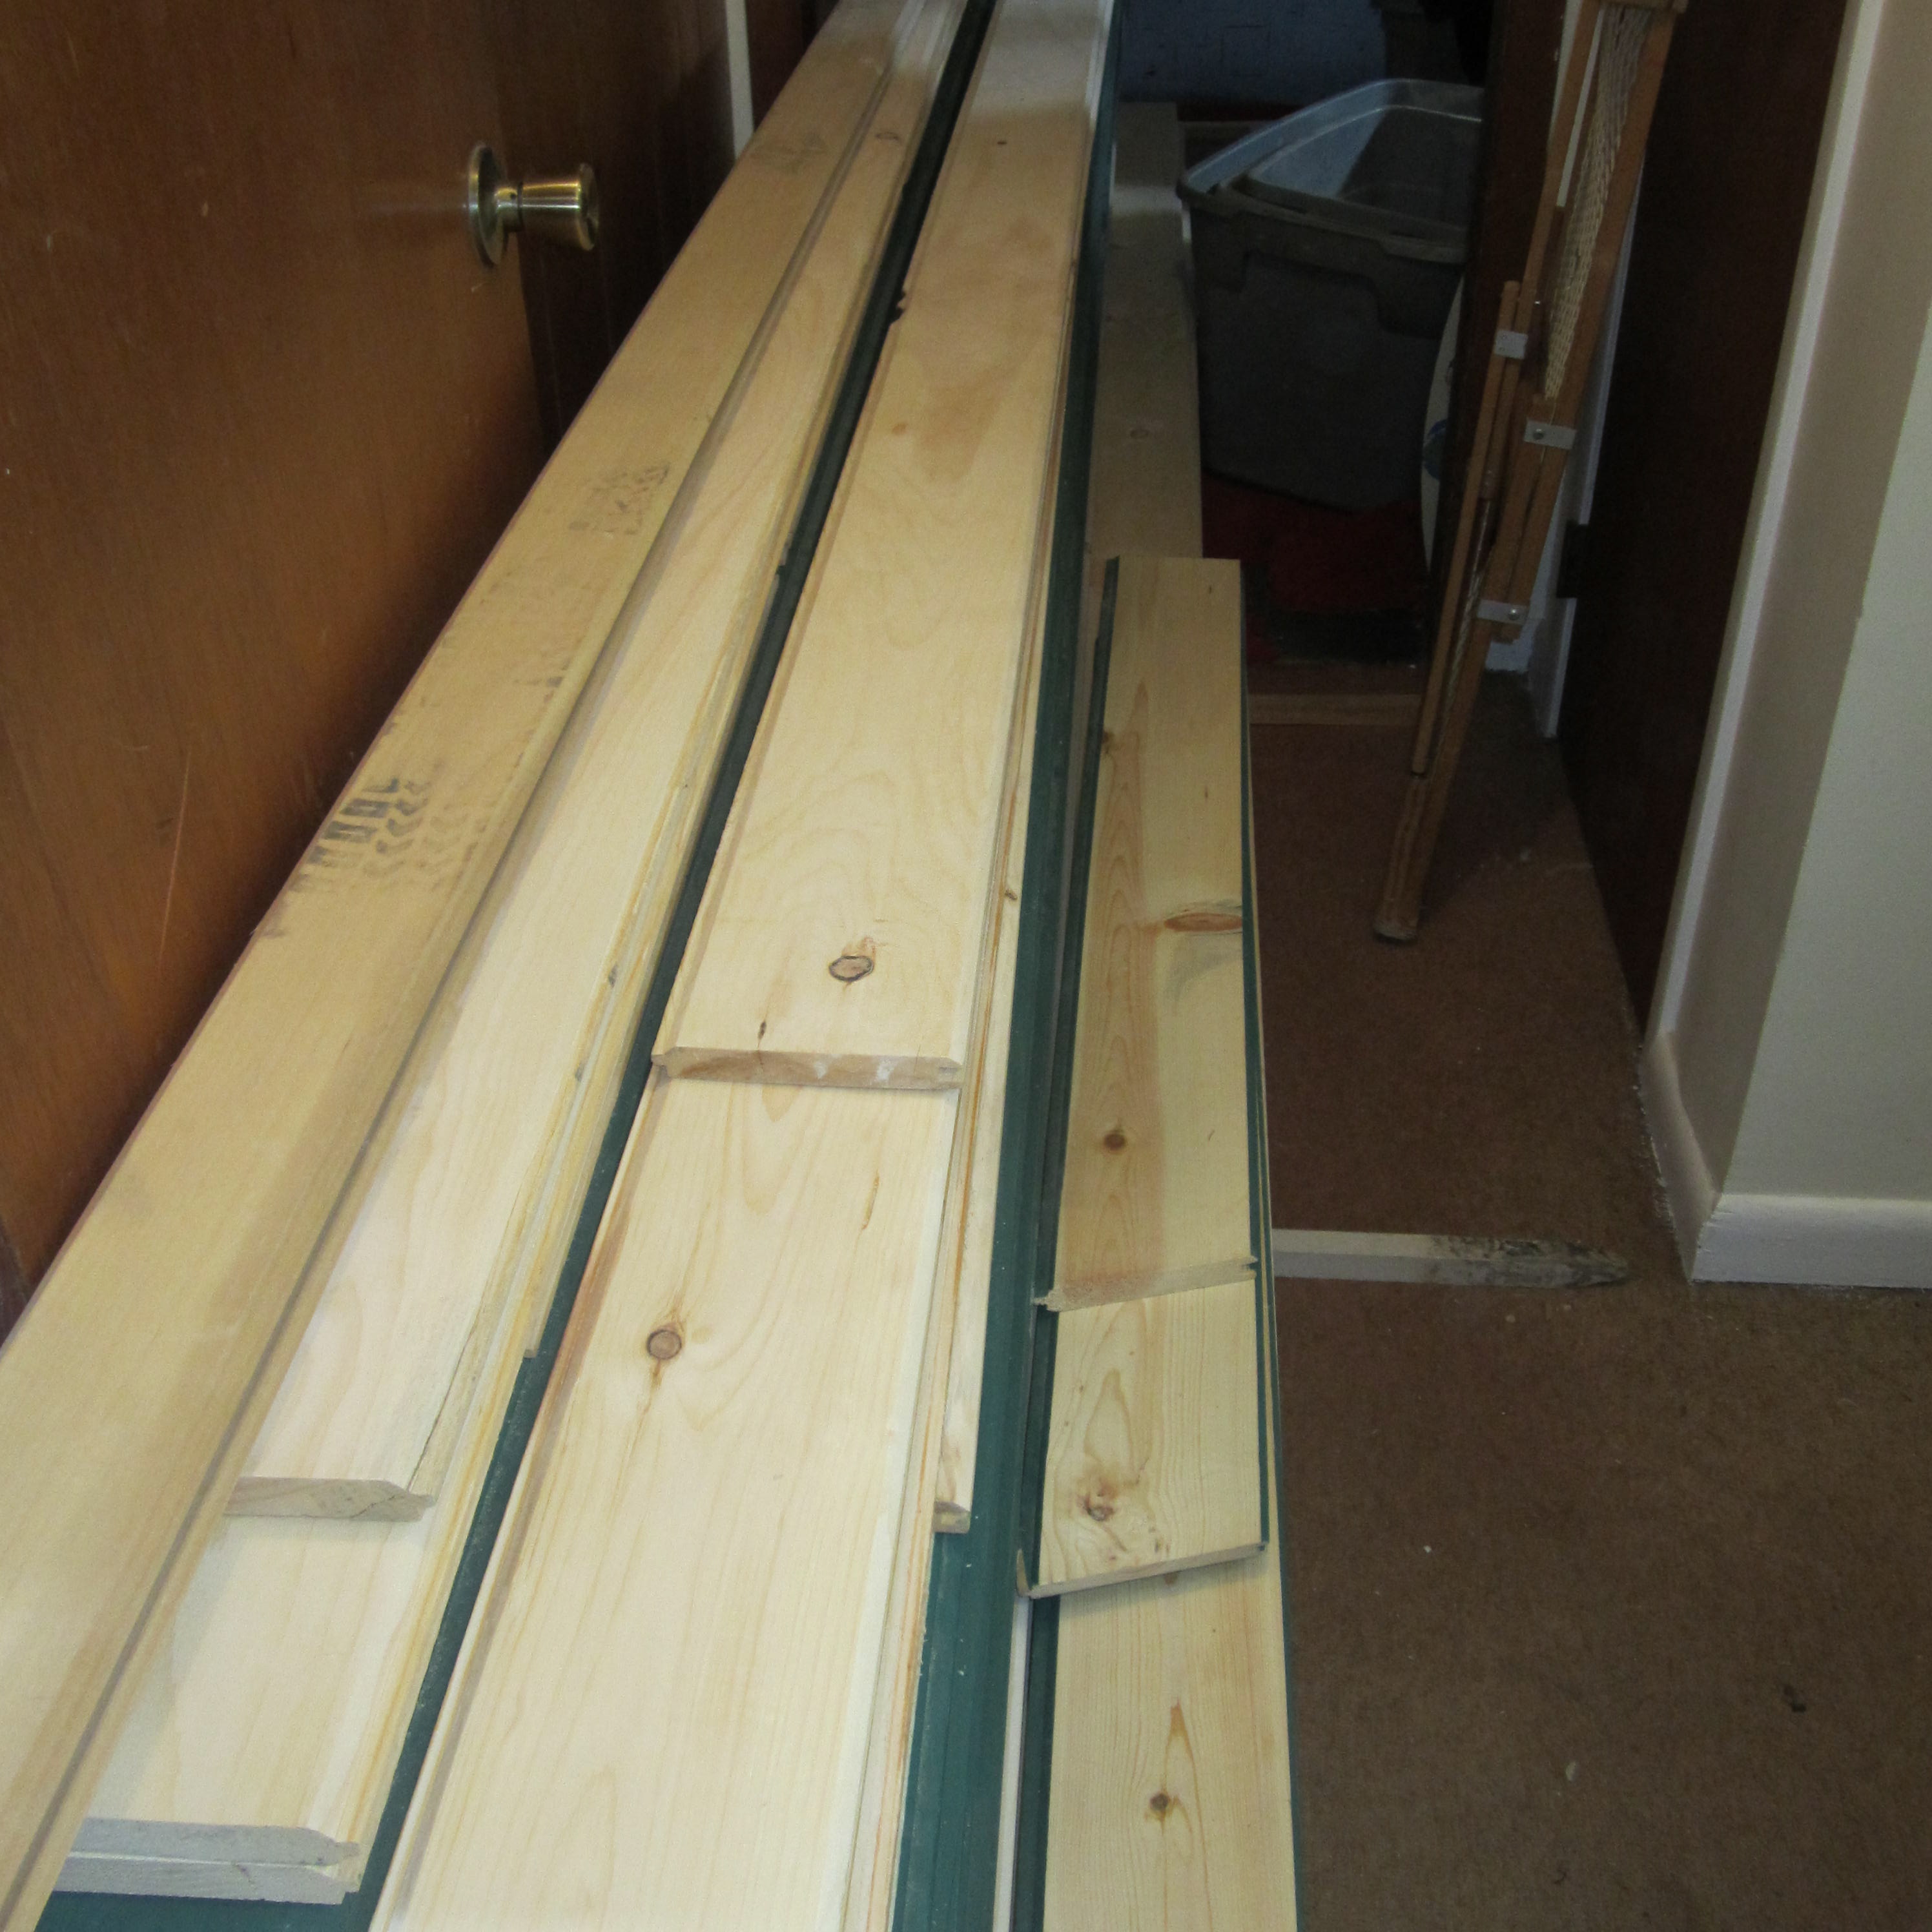
T&G Pine: Green painted and polyurethaned pine siding is now in our possession. If you count the coatings, we got around $1200 worth of “leftover” T&G pine siding for…wait for it…$450. Because they’re two different types, I plan to plane one and paint the other, but we should have enough interior siding now for the tiny house!

Scored T&G Pine Sidng

Insulation: Although we originally planned on getting sheep’s wool insulation from Oregon Shepherd (would have been so cool!) at around $3000+ for the tiny house and studio, we instead have secured enough 4” foam for both our tiny buildings for…wait for it…$150.

4" Insulated Concrete Foam: Our Insulation
4″ Insulated Concrete Foam: Our New Insulation

It’s not ideal because the foam was originally intended for ICF (insulated concrete forms), so we’ll have to use the table saw to cut it to 3.5 inches and cut off the weird ends.  We looked into rough cut lumber or furring strips for the added half of inch of insulation, but we were deterred by rough cut lumber’s warping issues or having to add wood to all the hundreds of cut framing pieces. No, thanks.

The reins are ours,

Chris

Reflections, Hindsight, and Alterations

  • If we didn’t have the winter holding us back, we would have never made the time to find such a deal.  Lesson learned: allocate time to accumulate.

Resources

  • Oregon Shepherd: Natural Wool Insulation — http://www.oregonshepherd.com/


Categories: People, Permaculture

Tiny House Trailer Restoration

Power Tools...Stay Clear!
Power Tools…Stay Clear!

Metal Fan

Bringing our trailer back to life was my first experience battling metal. Turns out battling and playing metal are two very different skill sets. Overall, it was a pretty exhilarating and tiring venture.

The Process

Cascading spark-fireworks fly while Chris gets nailed with breaking shuriken-like metal cut-off discs. Not painless.

Materials List:

  • 10 Metal Cut-Off discs
  • 5 Metal Grinding Discs
  • 1 Gallon of Metal Paint, Brushes & Rollers

 Tools:

  • Angle Grinder
  • Steel Cup Brush
  • Safety Glasses, Heavy Gloves, Mask, Latex Gloves for Painting

 Game Plan:

  • Use steel brush cup to grind off all surface rust
  • Cut off and grind unnecessary components
  • Use a rust converter/primer
  • Paint 2-3 layers of strong oil paint to seal

Got your Grain of Salt? Read on.

Remember, this was done by a guy who has no idea what he’s really doing—be encouraged and afraid. Disclaimer aside, the wood was past its prime and starting to detach already; luckily taking it off was simple with a drill and crowbar.

Decking Removed: Surface Rust

In an ideal world, I’d rent and use a sand blaster to get off all the surface rust. After some quick research, I got some quotes for around 300-500 dollars, so we decided against it. That left me with the ol’ time consuming way: 4 ½” angle grinder with a steel cup. Why is it always the ol’ time consuming way with me? I wore heavy gloves and mask for the dust—I always err on the side of caution with safety. It’s a good thing because those steel threads detached, stabbing me during this step.

Angle Grinder with Steel Brush Cup
Angle Grinder with Steel Cup Brush

After steel brush grinding a third of it, I got fed up and called the guy who sold me the Rust Converter, and I asked him if this step was really necessary. He said yes. I got back to work—rattling my skeletal frame like a baby toy.

Steel Brushed: Not very Differet!
Steel Brushed: Not very Different!

The next step was chemistry…so you wouldn’t understand. I kid. Maybe you would; I wouldn’t.  I looked for a somewhat eco-option, so even though POR15 Rust Preventative and paint was recommended on online, I went with Rust Converter from The Rust Store. “Rust Converter, a water-based primer, contains two active ingredients: Tannic acid and an organic polymer.” It isn’t harmless, but it looks a lot less processed and toxic. I applied two coats as recommended. I got a gallon and used about 3/5ths of it. Looked a lot better with it! *You may want to use Bull Frog Rust Remover or Rust Release Supergel before the rust converter, but I thought my grinding work was enough prep.

Rust Converted: Better.
Rust Converted/Primed: Better.

Rust Spots Still Slightly Visible

Before painting the trailer, it was time to do some cutting, the scary spark stuff. Using metal cut-off discs and grinders, I cut off the lip on the inside wheel well, mending plates in the front, and metal hangers in the back near the rear lights. I also grinded down and cut the screws that previously held the wooden bed down.

Confession: I don’t know why the blades warped and broke so quickly but they did; I must have been using the wrong adapter with the angle grinder (*Confirmed with Pa). The discs would snap and shoot out and I got hit twice in the arm pretty miserably, haha. Something needed adjusting, and I didn’t figure it out totally. The ¼” steel was tough to cut through; so I did start to use the thicker blades and even the grinder disc once to get through the entire thing.

Iron Maiden Guides My Blade

The D-rings were 2” below the top of the frame, so I left them on the trailer. I know a lot of people cut off all the unneeded trailer parts, but I think I can use these to secure things to my trailer (potential Solman Solar generator) or even use them to brace the trailer to the ground if I lived in a really windy area. Hope leaving them doesn’t end up biting me in the butt….like a metal cut-off disc…I also used silicone for some holes left over from the screws as well as threaded road to fill in two large holes. Some of the steel tube framing is hollow and open, so I don’t know if this is necessary for all trailers for the metal to adjust or if it’s going to lead to future rust issues. Feedback and thoughts would be appreciated! With everything cut, grinded, plugged, and primed, I went with the only metal paint I found in the area: rust-oleum. I read mixed reviews on it, but I had faith in the preparation job, so I hoped the positive reviews were right! Although not eco-friendly, the paint was very sticky and made the trailer look spanking new! I put two coats on. After the winter, I’m happy to report the paint is still holding and looking great. Satisfying result!

Painted Trailer: Looking Spanking New!

Paint Close Up
Paint Close Up

Painted Wheel wells
Painted Wheel wells

The reins are ours,

Chris

Reflections, Hindsight, and Alterations

  • Before the framing lumber got delivered I had a little time so I put a quick third coat on this spring even though the paint was holding up well.
  • Had to grind off the paint for the wheel’s threaded rods, so I could attach the wheels and nuts this spring—a little extra work.
  • I wonder if I should have tried to grind off the rust with a grinding disc instead of a steel cup brush. It would have exposed more of the metal and taken more of the rust away. If people do that–I’d get the rust converter/primer on ASAP because it re-rusts quickly when exposed to the elements.

Resources

  • The Rust Store: http://www.theruststore.com/
Categories: Building

Leveling Tiny House: Level Trailer by Unlevelheaded Man

Cinder Block Style
Cinder Block Style

Level Up

Instead of buying scissor jacks, we opted to go the cheap route by borrowing cinder blocks from dad and a 10-ton bottle jack to adjust every side slowly.  Time consuming but cheaper, and it will have the benefit of being very sturdy during construction. I used blocks in the four corners and two pillars in the middle. Use plywood or boards if ground is a little uneven or if you’re building on the grass.

Used Wood Pieces with Cinder Blocks

The trailer is currently within 1/16 inch of being level. Should do the trick. Grateful the trailer is pretty level to begin with. Kai, from 2Cycle2gether.com, had a off-level trailer. He ended up sistering the steel framing with wood joists and raising the wood where needed.  Check out his solution here.

Reflections, Hindsight, and Alterations

  • Ebay has a set of four scissor jacks for $100 total after shipping (good deal).  Would have been nice to buy the scissor jacks but also it was an unnecessary purchase—something I’m getting better and better at avoiding.
  • Underneath the blocks the trailer remains “unaltered.” I’ll have to refinish those places after the house is built and paint them, too–that would have been another advantage of the scissor jacks–exposing all the metal for refurbishing.
Categories: Building