Warning: mkdir(): No such file or directory in /var/www/vhosts/oneidatrail.com/httpdocs/app/plugins/photo-gallery/framework/BWGOptions.php on line 371
Building Archives - Page 2 of 4 - Oneida Trail
Menu

Tiny House Trailer Bolts: Welding Went Well

Calling All Local Welders

“Yea, how much would it cost to weld threaded rod to a trailer for a tiny house? Like sixteen pieces.”  Tiny house enthusiasm ensues. Confusing welding terms are shared. Various prices are quoted.

quotesTenacity for Learning or Stubborn Frugality

The price sounded like it would cost around $250. As a growing DIY guy, I’m more and more reluctant to hire help. I’d rather learn the skill–and overcome my reservations and fears about trying it. Welding the rod to the trailer was a prime example of this tenacity for learning (the nice spin on the behavior).  The decision was finalized after talking with two friends who have welded before. They confirmed my pa’s MIG welder should do the trick–or at least I should try it and see how strong the welds would be.

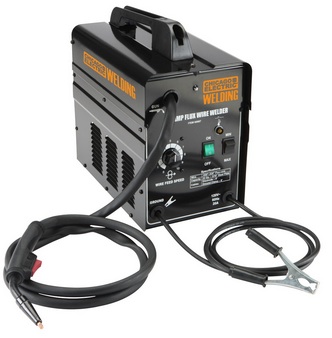
Enter the MIG Welding Unit

Pa purchased a 90 Amp Flux Wire Welder by Chicago Electric from Harbor Freight for $115 awhile back. It states that it’s not suited for aluminum or stainless steel. I forget what threaded rod we used–but I hope it wasn’t stainless now! They have a stronger unit that does stainless steel for $199.  These units don’t require gas–they eject heated-up metal as they make their arc, which is when you use electricity to heat metal to bond the two metals. Like all welders–these puppies need to be grounded and emit dangerous levels of electricity–all precautions should be taken.

See what this little guy can do!

Welding Preparations

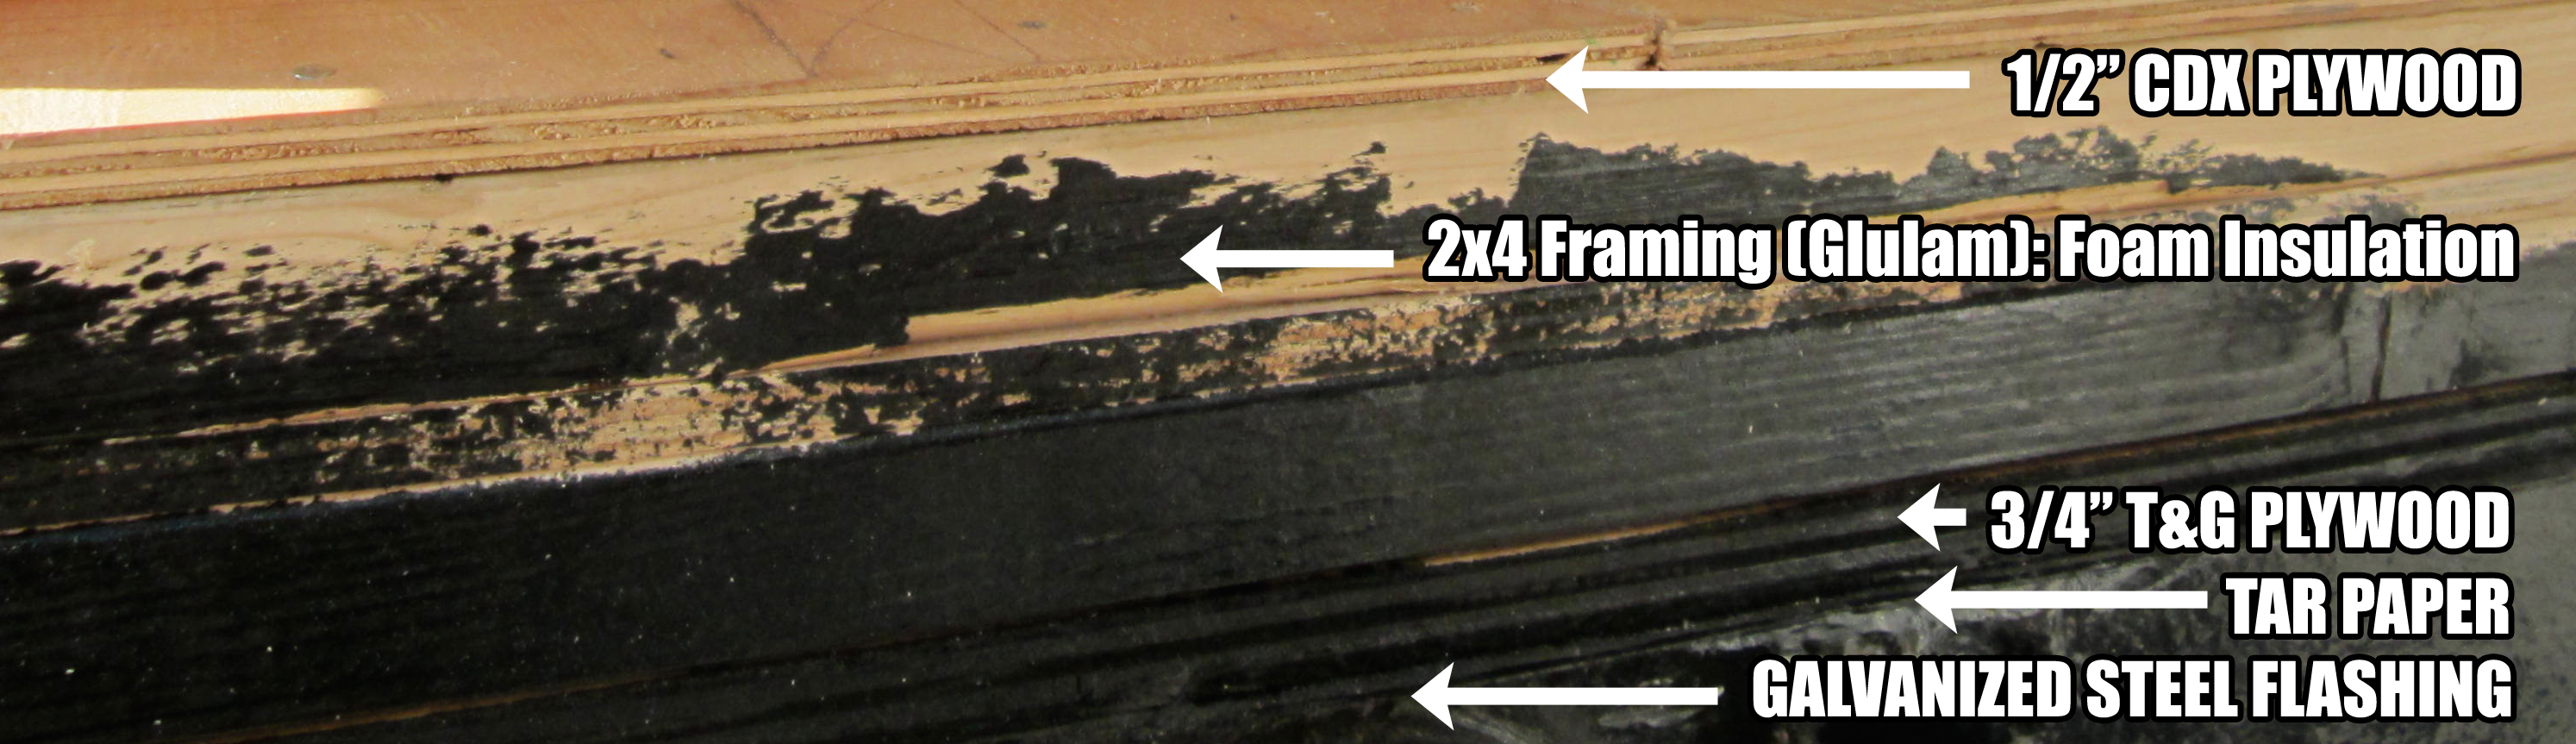
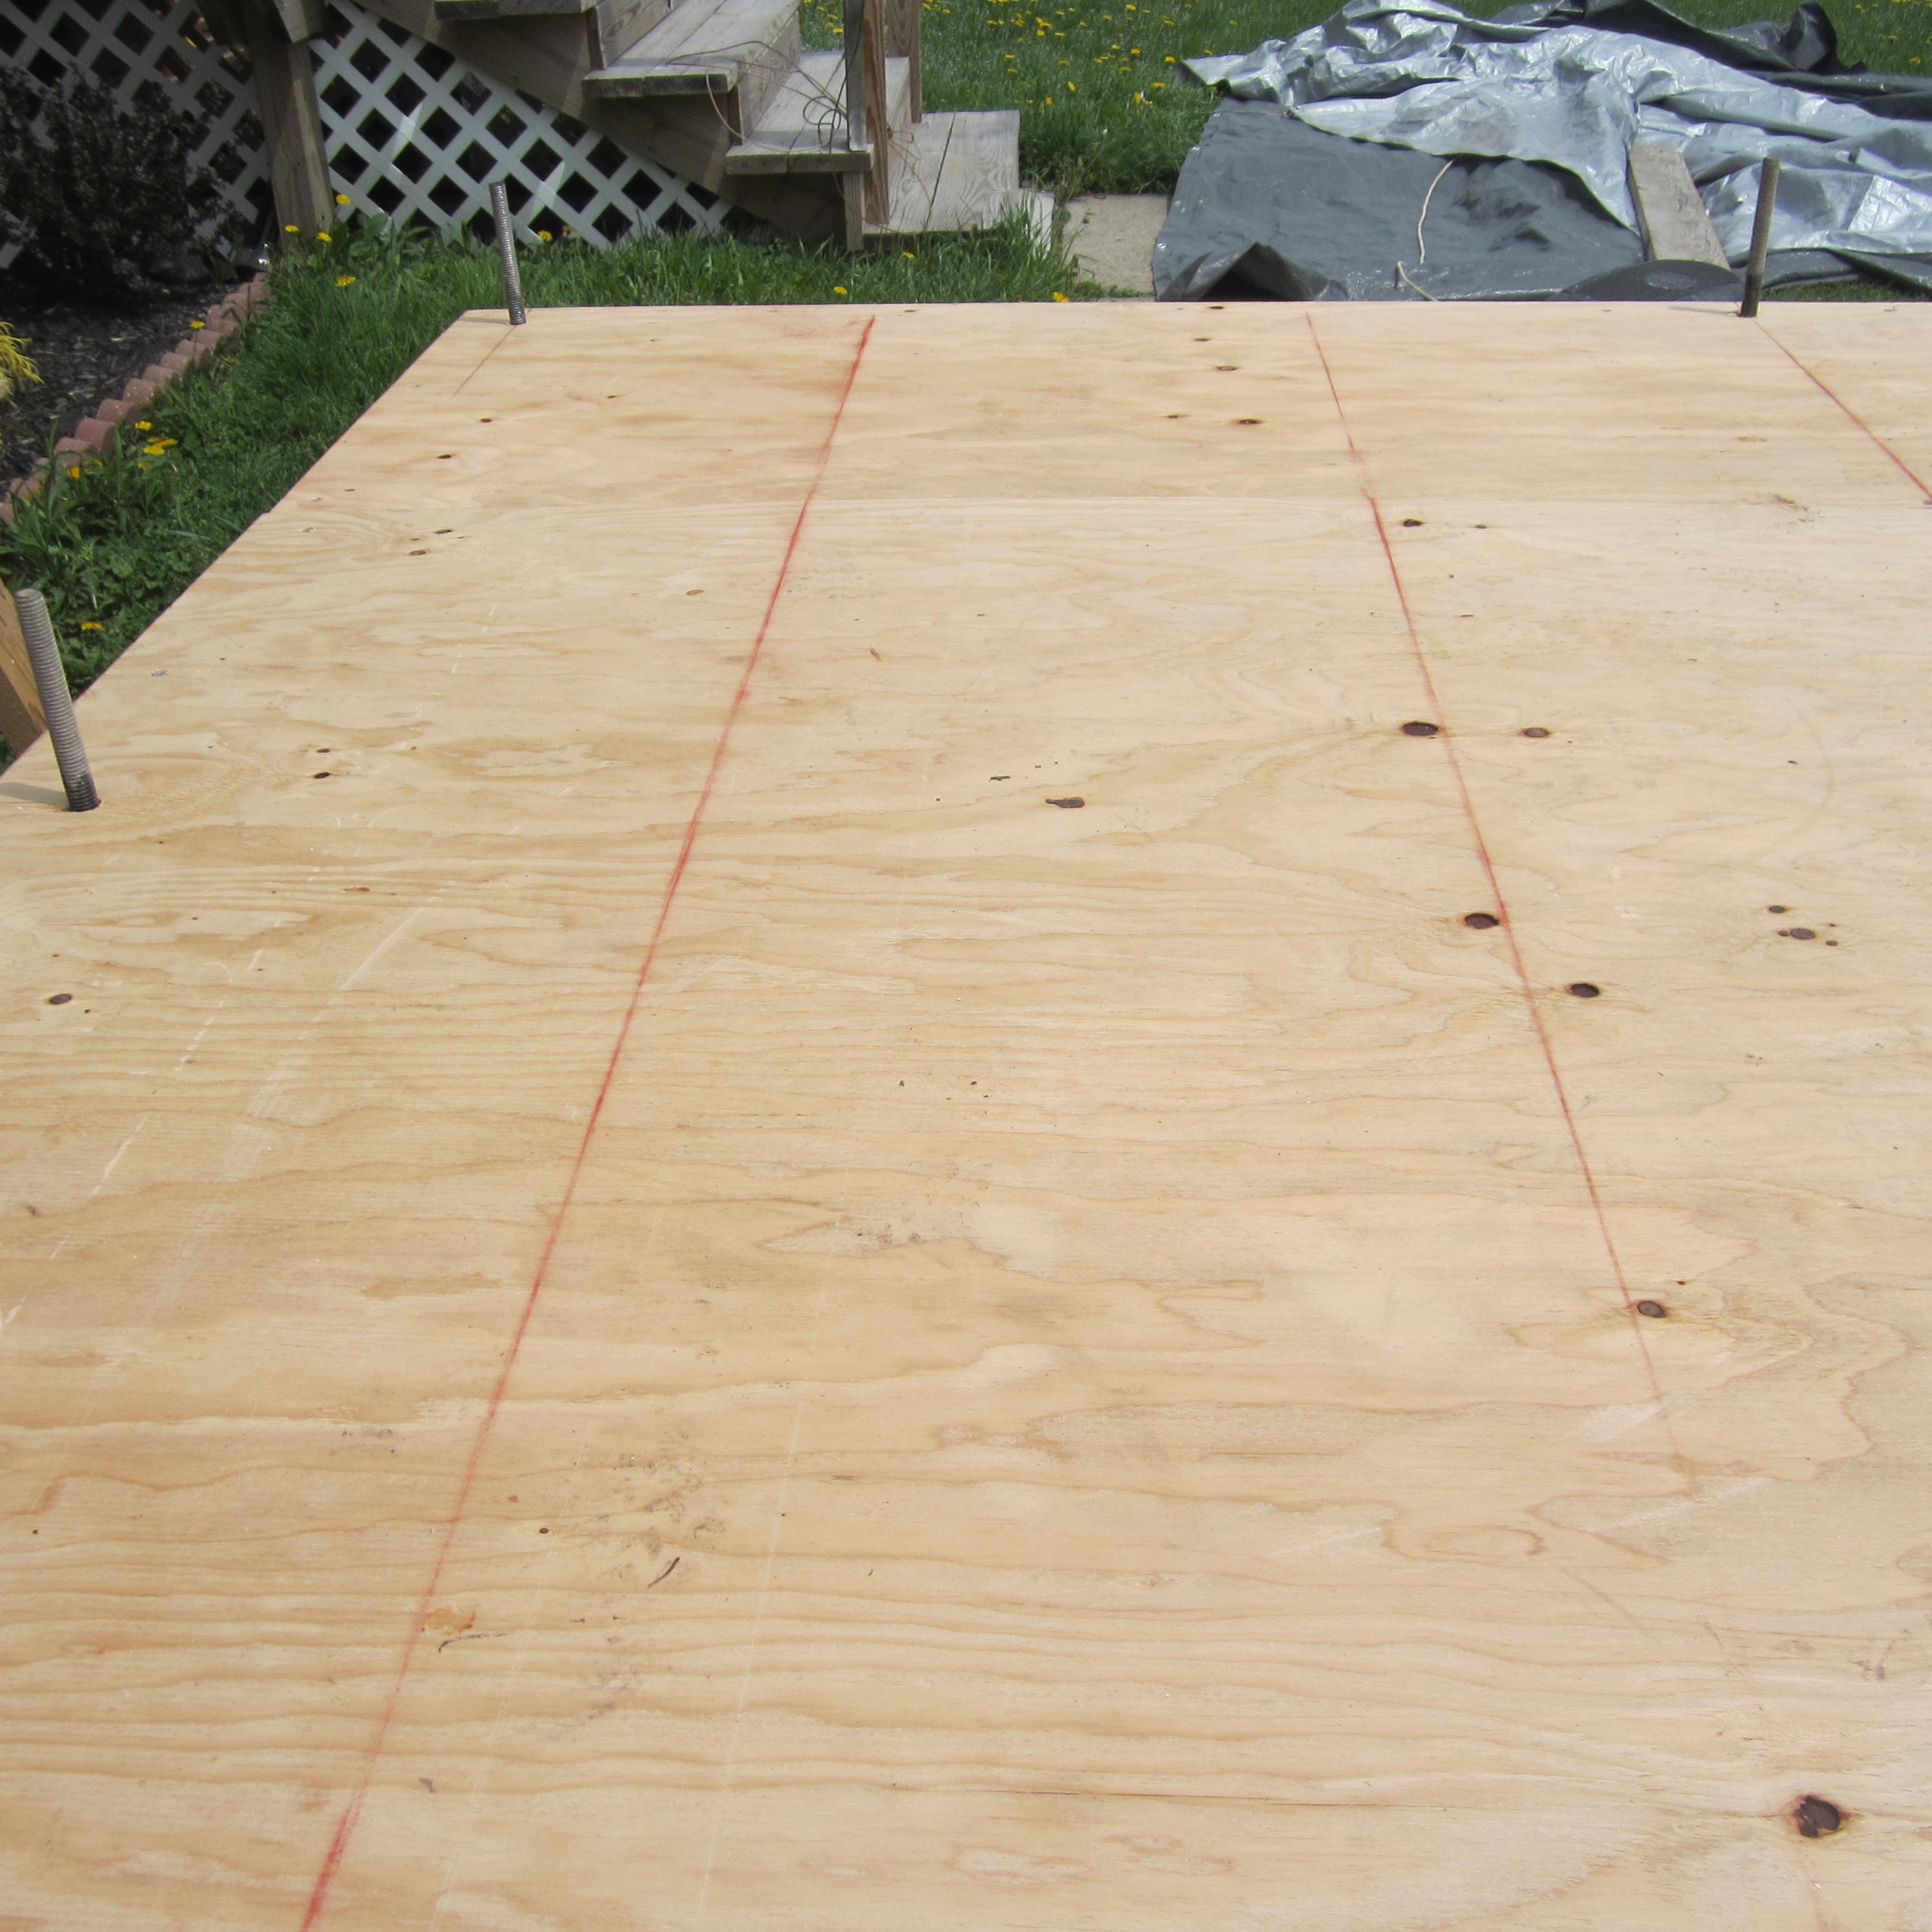
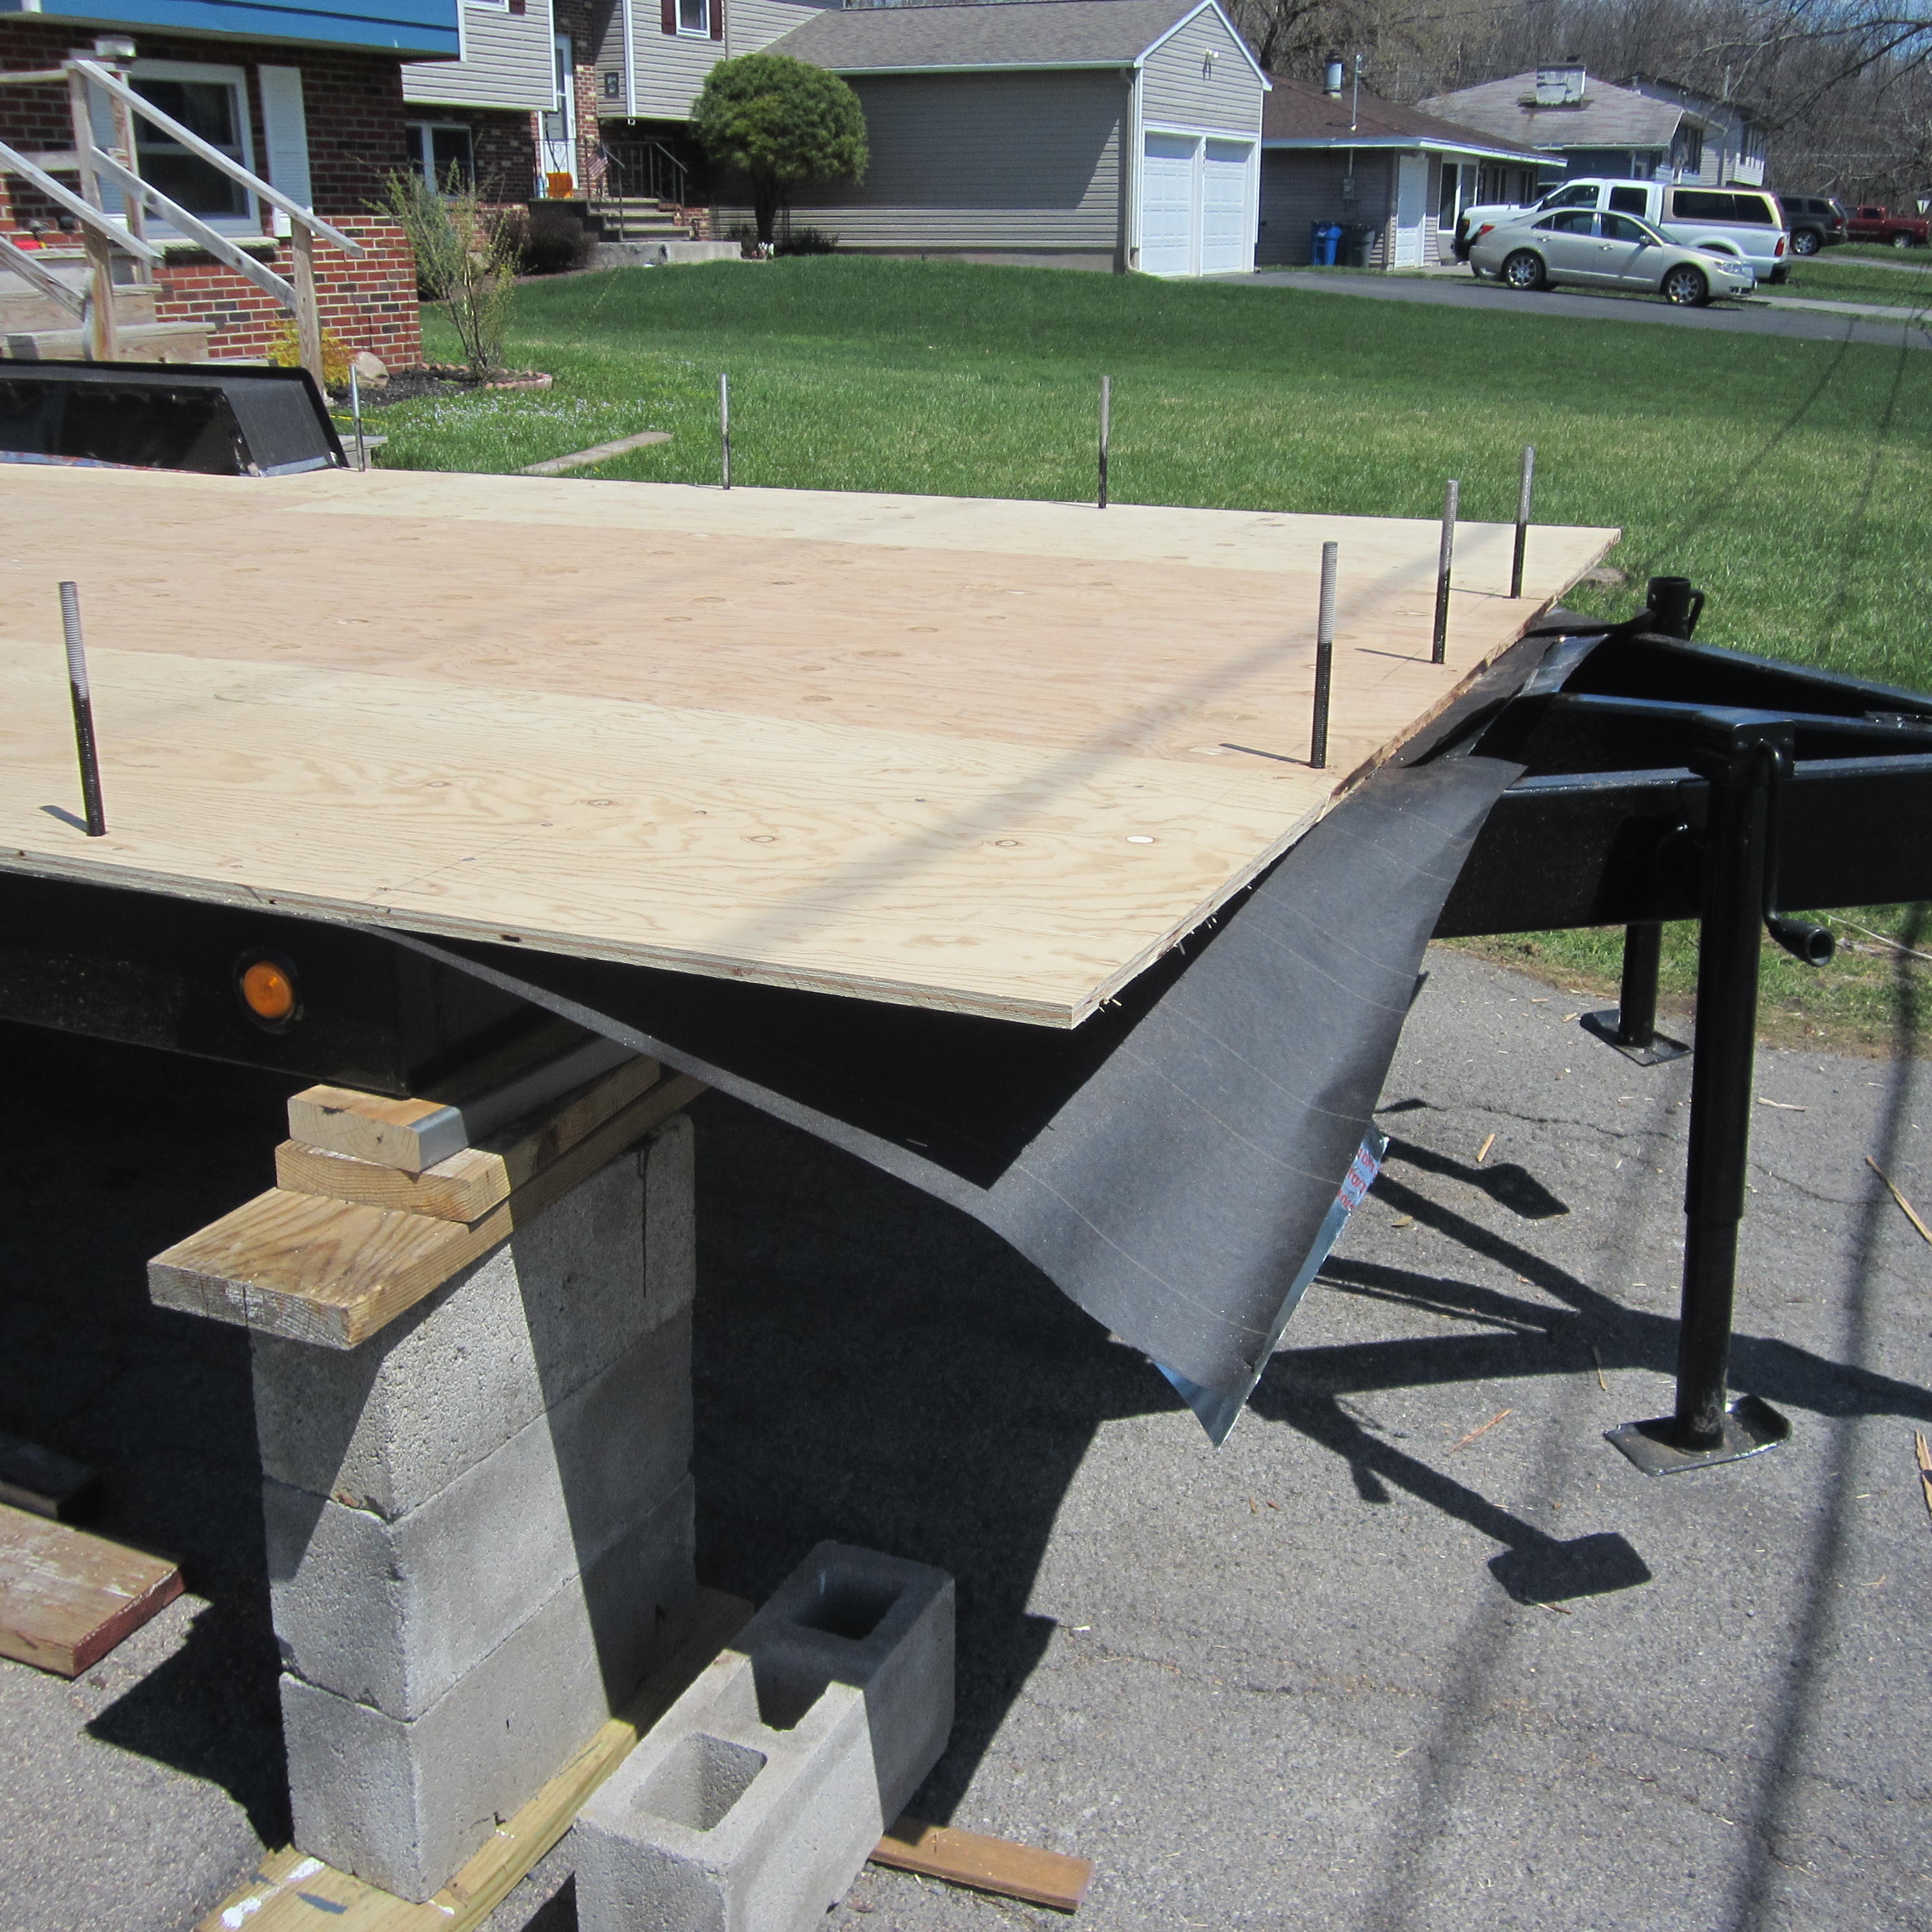
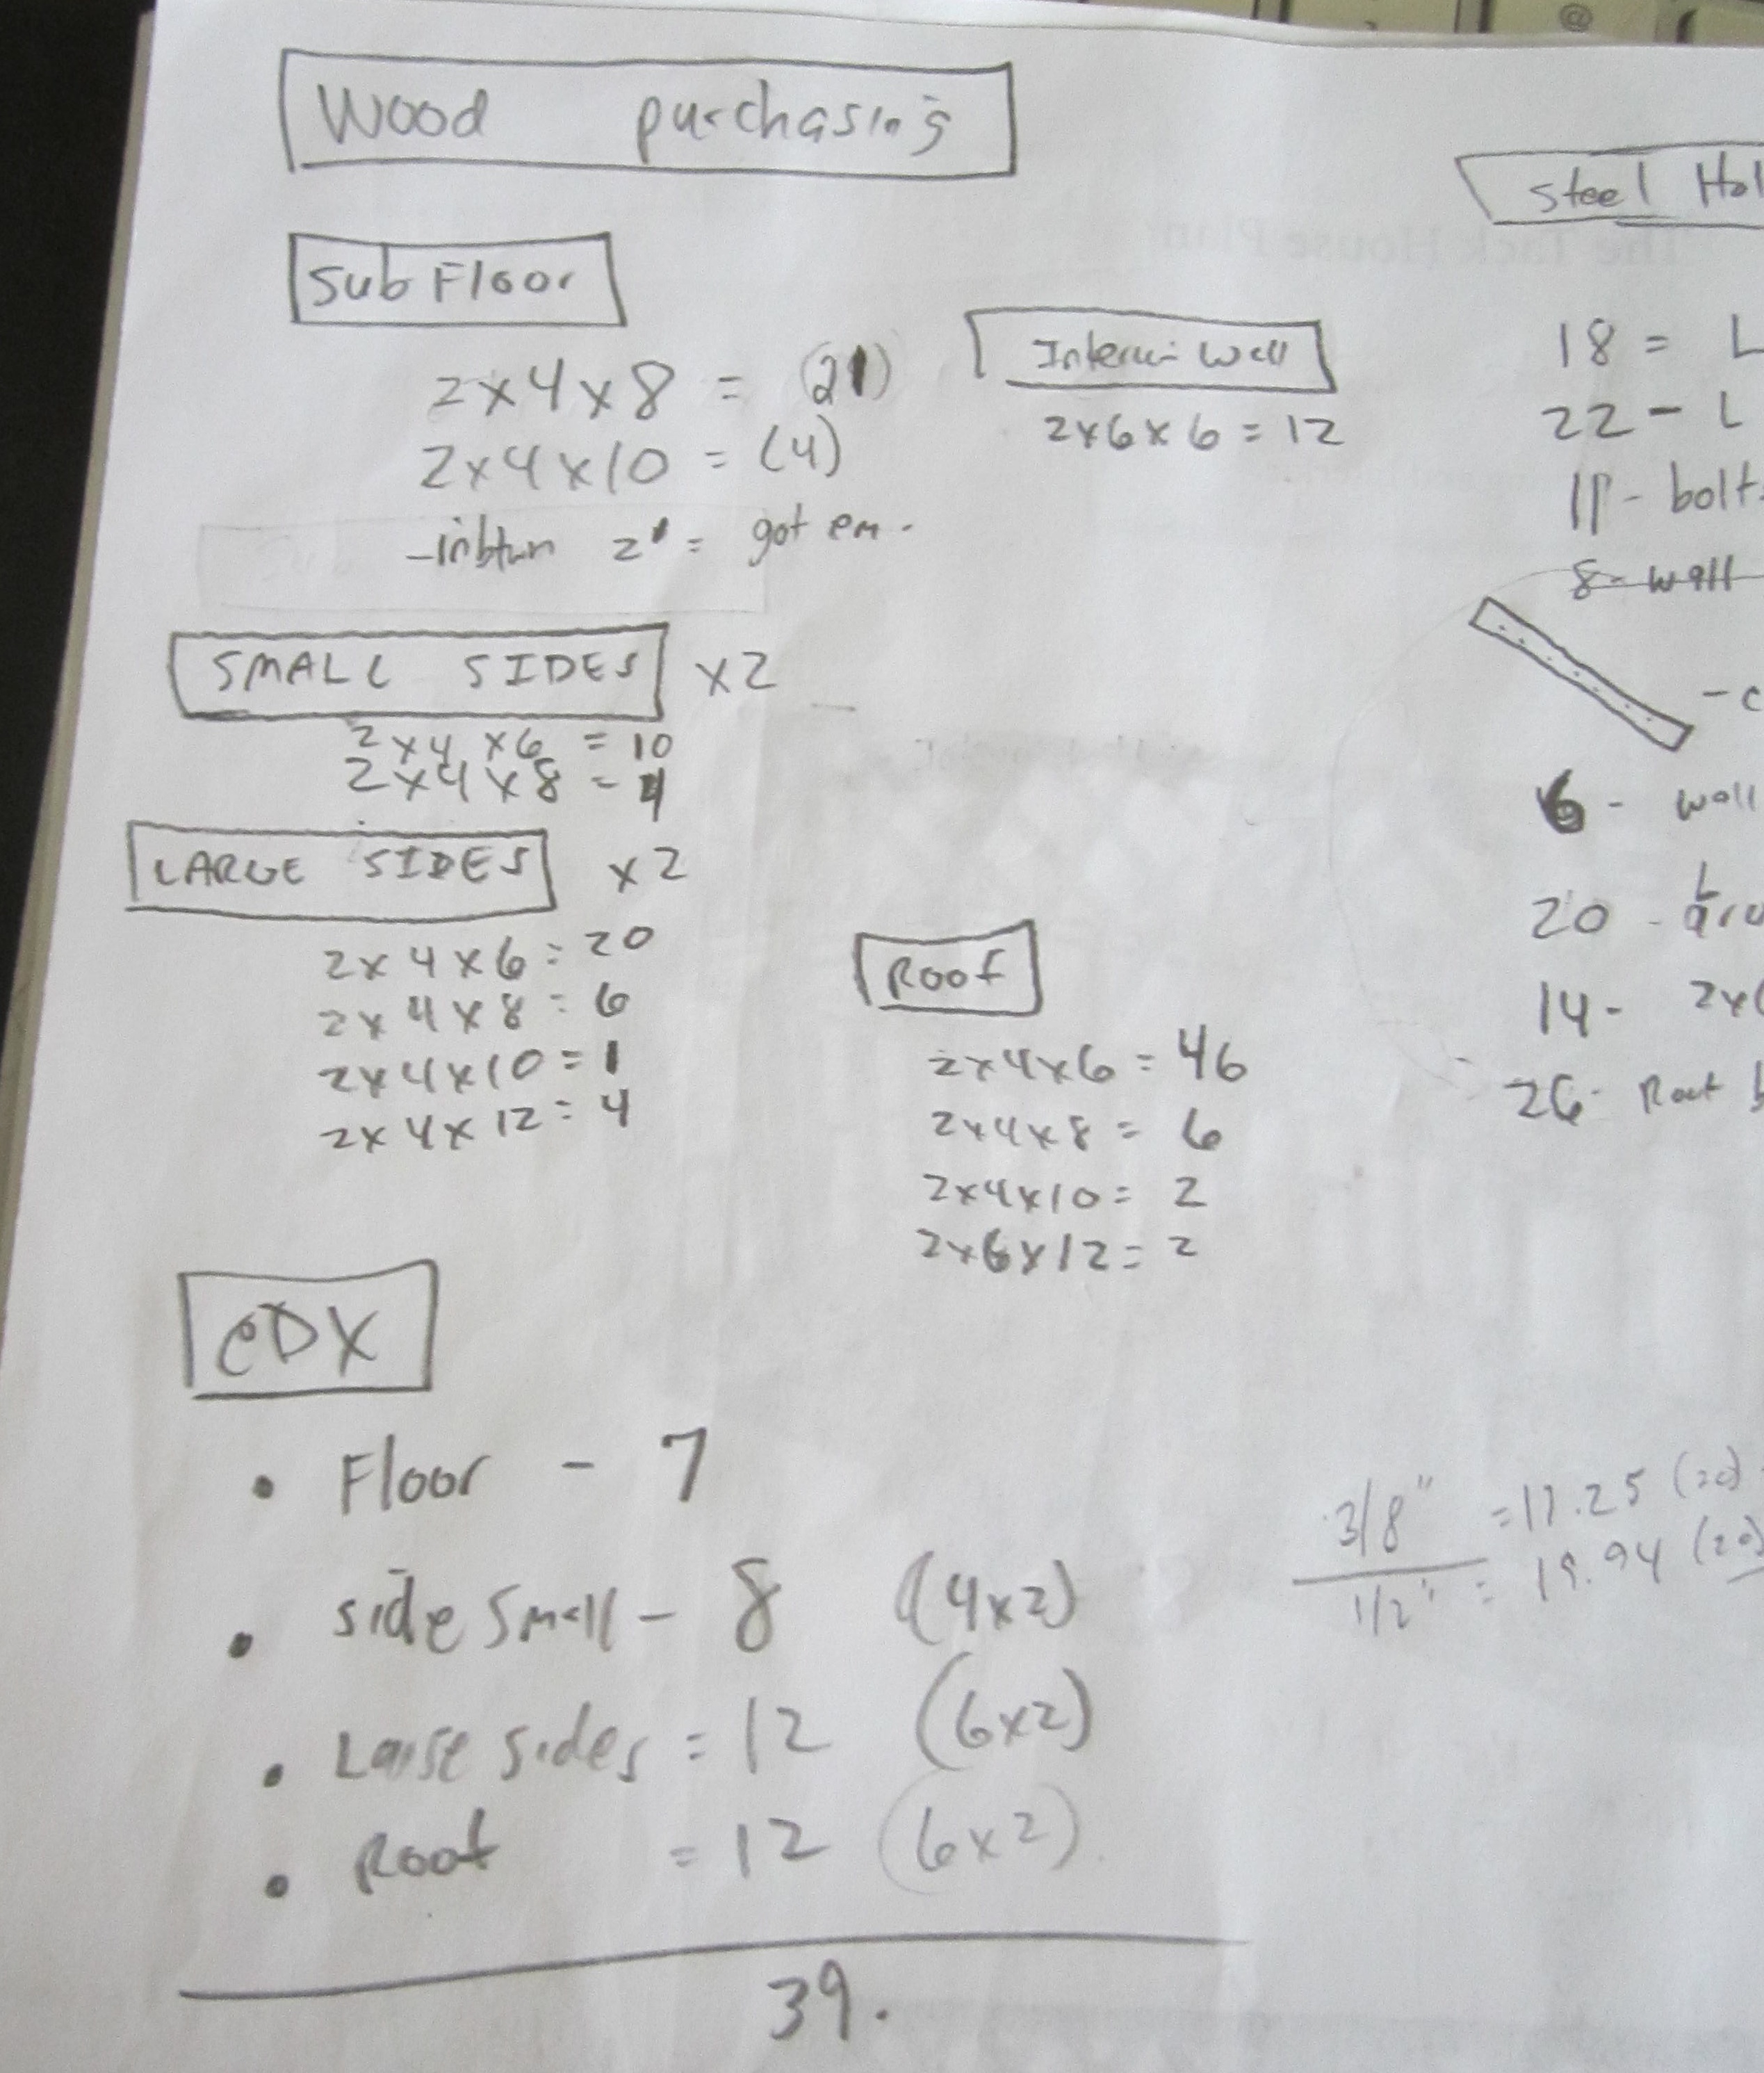
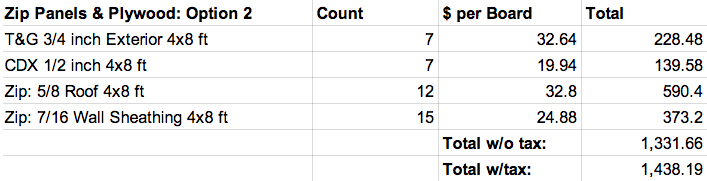
You shouldn’t weld over paint–nasty smelling and it will compromise the welds, so after grinding down my beautiful paint job, I marked lines on each side of the threaded rod after making sure the rods were straight up and down and level.  I also precut all of the rods. As stated before, I had 6 inches of steel tube framing and 6 1/2 inches of subfloor with the sill plate. I added another two inches for a buffer and to have enough for the Simpson Strong Tie HTT5 to fit over. I rounded up and went with 15 inch pieces, so I would need 20 ft of threaded rod ($60-70 depending on grade and type).  *I cut off around 2-3 inches in the end, so I had too much.

Simpson Strong Tie HTT5

Tools:

  • Welder
  • Welding Gloves
  • Welding Mask (Automatic preferred) *Check batteries in it!
  • 10 Gauge Extension Cord. We used a 12 Gauge Extension Cord.
  • Stronger Welder Might Need 30+ Amp Plug. Our 20-amp did the deed.
  • Cheap Steel Brushes
  • Extra Welding Wire Spool. We used two spools.
  • Slag Chipping Hammer

Materials:

  • Cut Pieces of Threaded Rod

Advice from Ollie

One of my friends with welding experience gave me the following tips and expectations and also led me through a welding practice session at his workshop:

  • With the MIG welder, you’ll be using Flux Core Wire. This is messy. Will create slag (black glassy layer stuff) which you’ll have to chip off or scrub with a wire brush. Use non-flammable clothing because this stuff with spray you a bit. *Followed advice and got sprayed quite a bit. I didn’t need hammer to chip off slag; the steel brushes were enough.

  • Your welder has lower amperage, so you won’t be able to fine tune its setting as well as other welders. You’ll probably need it on max. Adjust the wire feed to get a nice bacon sizzle that doesn’t shoot off too much slag. *Yes, it was on max, and the wire feed was around 8. This was high because we had a large gap to fill in.

  • Make sure to have a strong extension cord. *Got one.

  • I looked at your welder’s manual. It has 220% duty cycles, so after every 2 minutes of welding, you’ll have to let the welder cool for 8 minutes at its max power setting. *We rested it for about 5 minutes. Pa wasn’t patient.

  • You can use zinc primer for the welded area. *Didn’t use. But after cleaning the welds, I did quickly use rust converter as a primer (otherwise surface rust would occur overnight).

  • Use a mask for zinc vapor, or you’ll get metal fever. *Yikes–I wore my respirator; never got a crazy fever.

  • Take a sledge hammer and hit the rod after. If it holds, you should be fine. *We did this—hit the rod multiple times to really test it. They were holding very well! Yay! Also, I had to sledge some of the rods a bit when putting the 3/4 inch plywood over them.
Pa Starting Off the Welds

Threaded Rod Placement

I didn’t have to weld along the height of the whole steel tubing (6 inches), but I thought it was a nice overkill idea.  My friend Ollie explained that the more space in-between the metals, the more you can inject metal into that in-between area, bonding the metals while creating a stronger weld. For this reason, I chose to run the welds along the entire tubing instead of a butt weld (just placing the rod on top of the trailer framing–little surface area between the metals ). I heard butt welds can be sometimes finicky and unreliable, too….probably depends on the welder. For me, I was going for maximum strength; however, placing the rod along the tubing shifted the holes in my sill plate–they wouldn’t be in the center of the plate anymore, but it would still work out, so “I made my bed to lie in.” One alternative option would be to drill a hole in the frame. Place rod into the hole–weld around the top of it. You also could add an additional hole and welding point through the bottom of frame.welding rod info

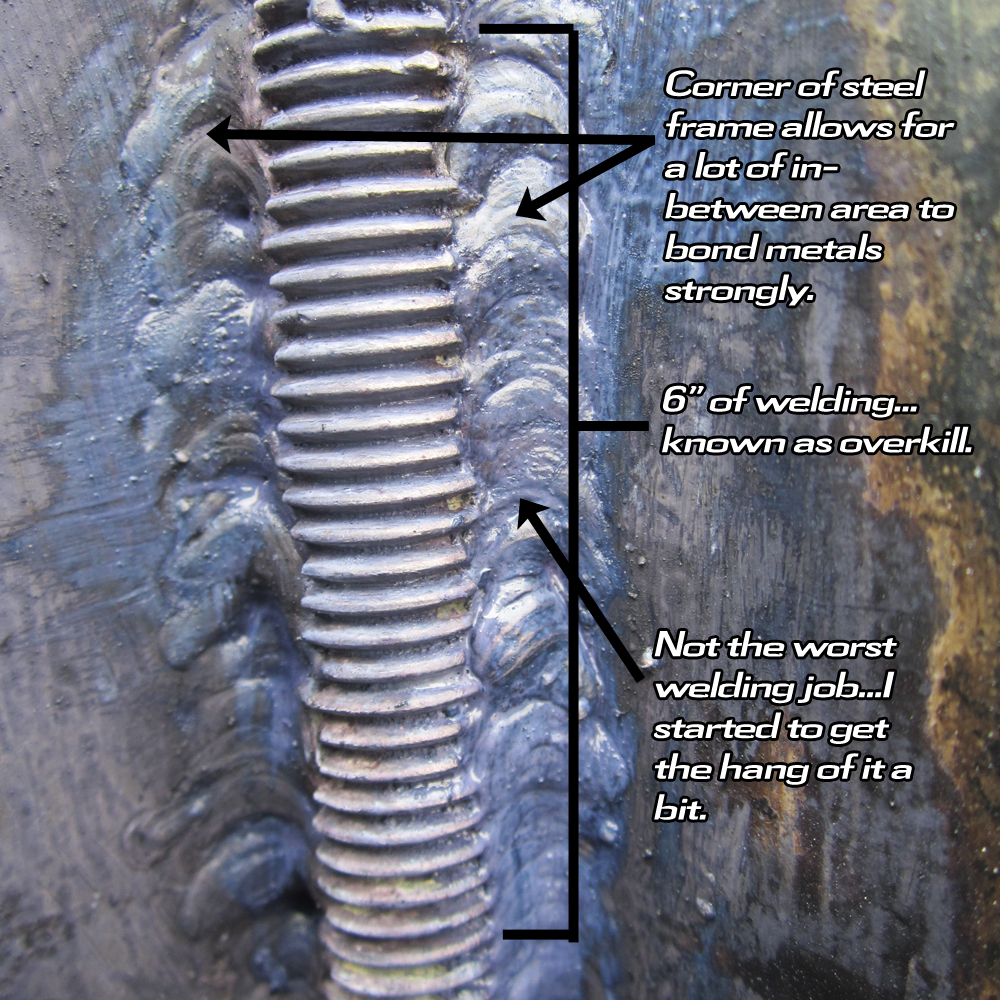
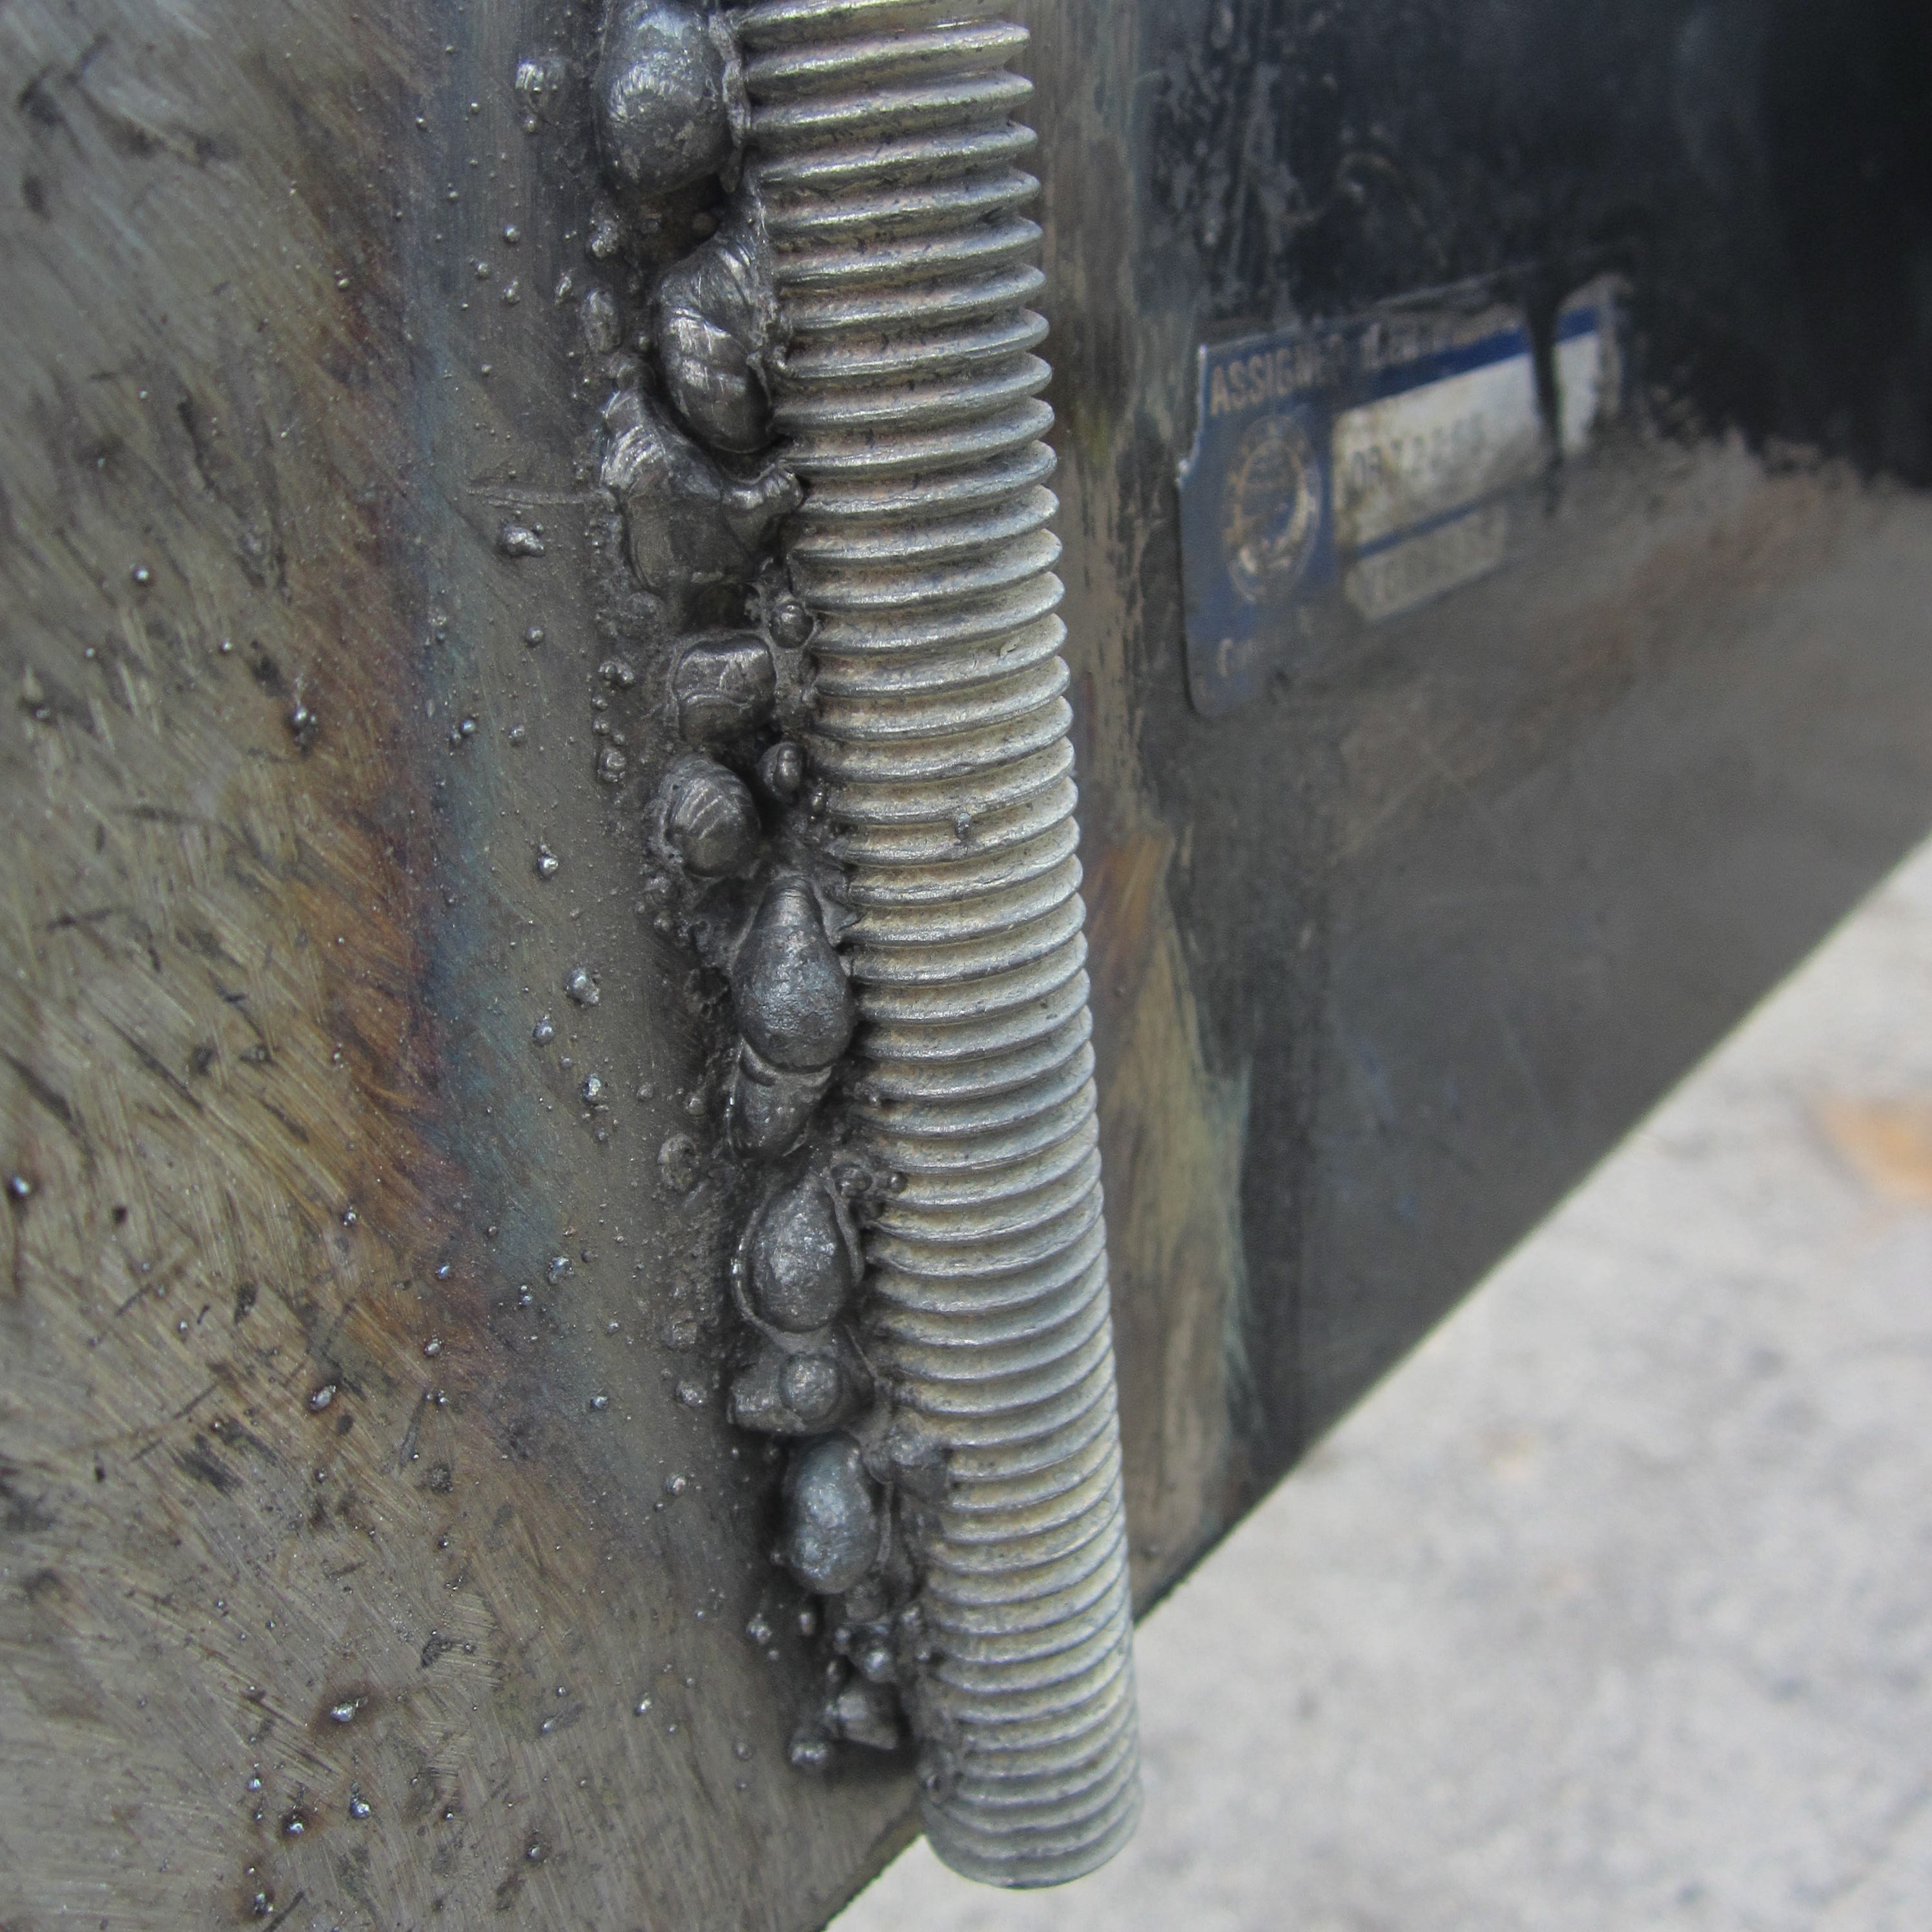
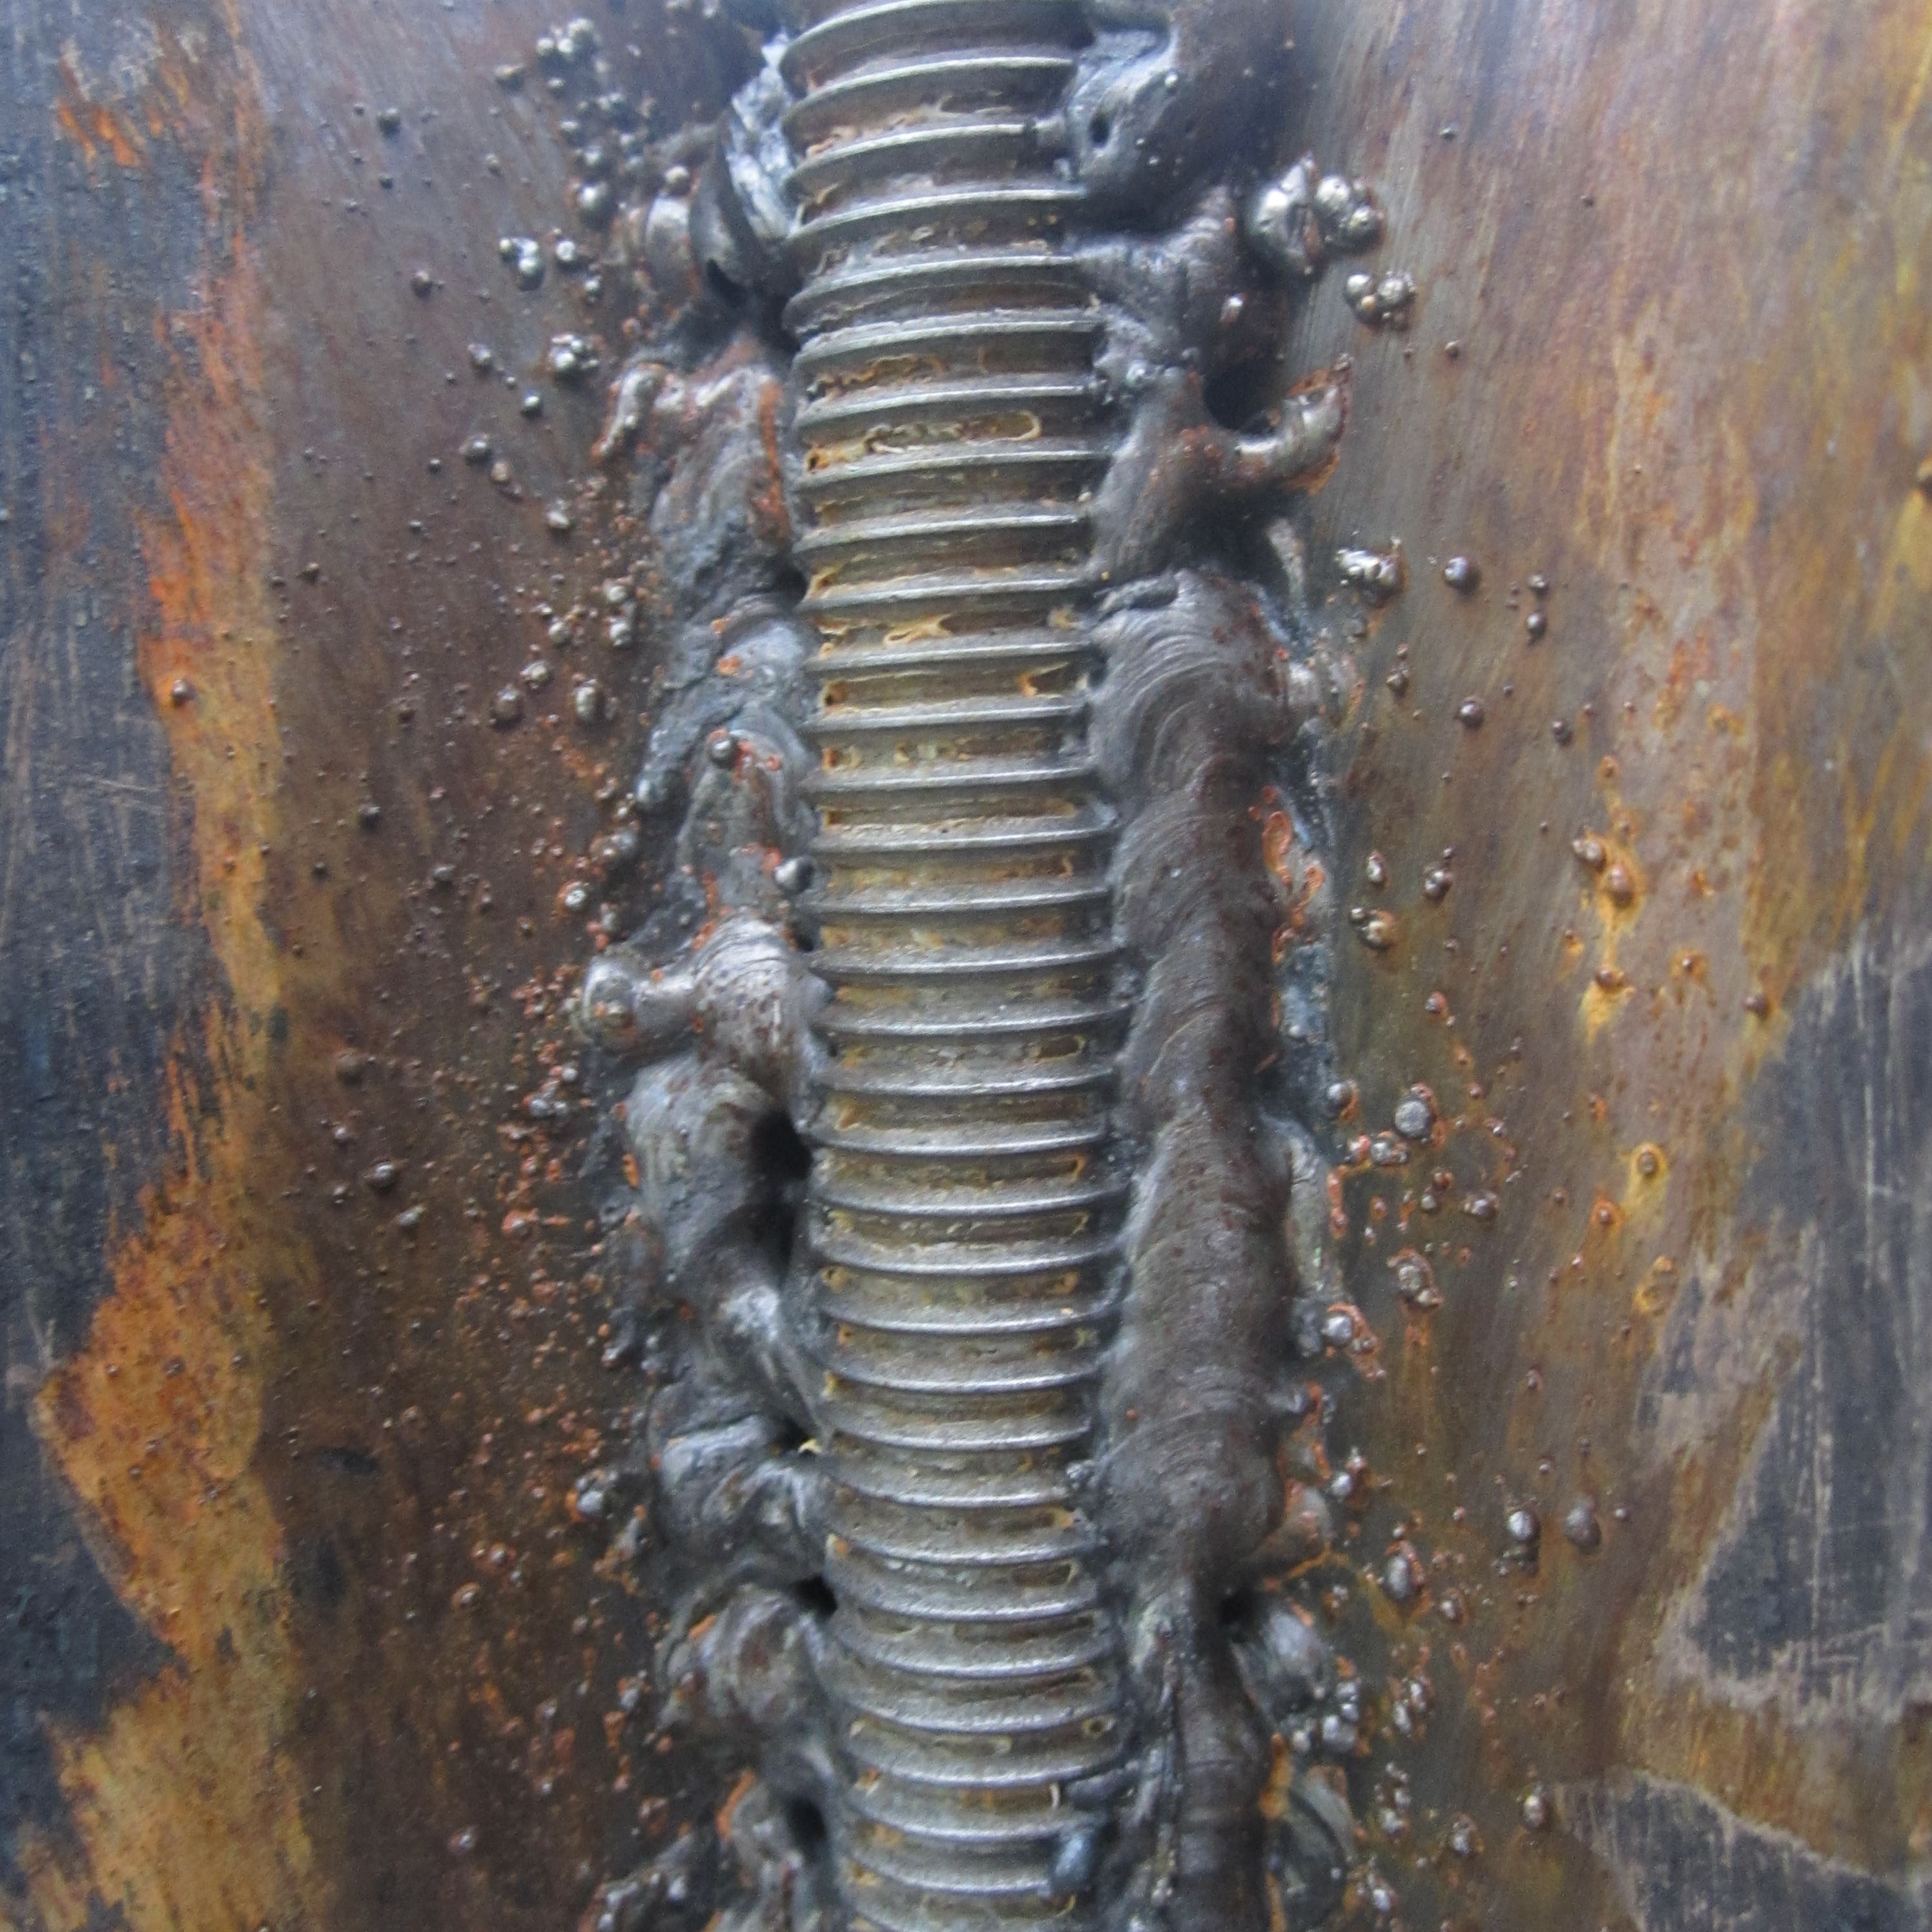
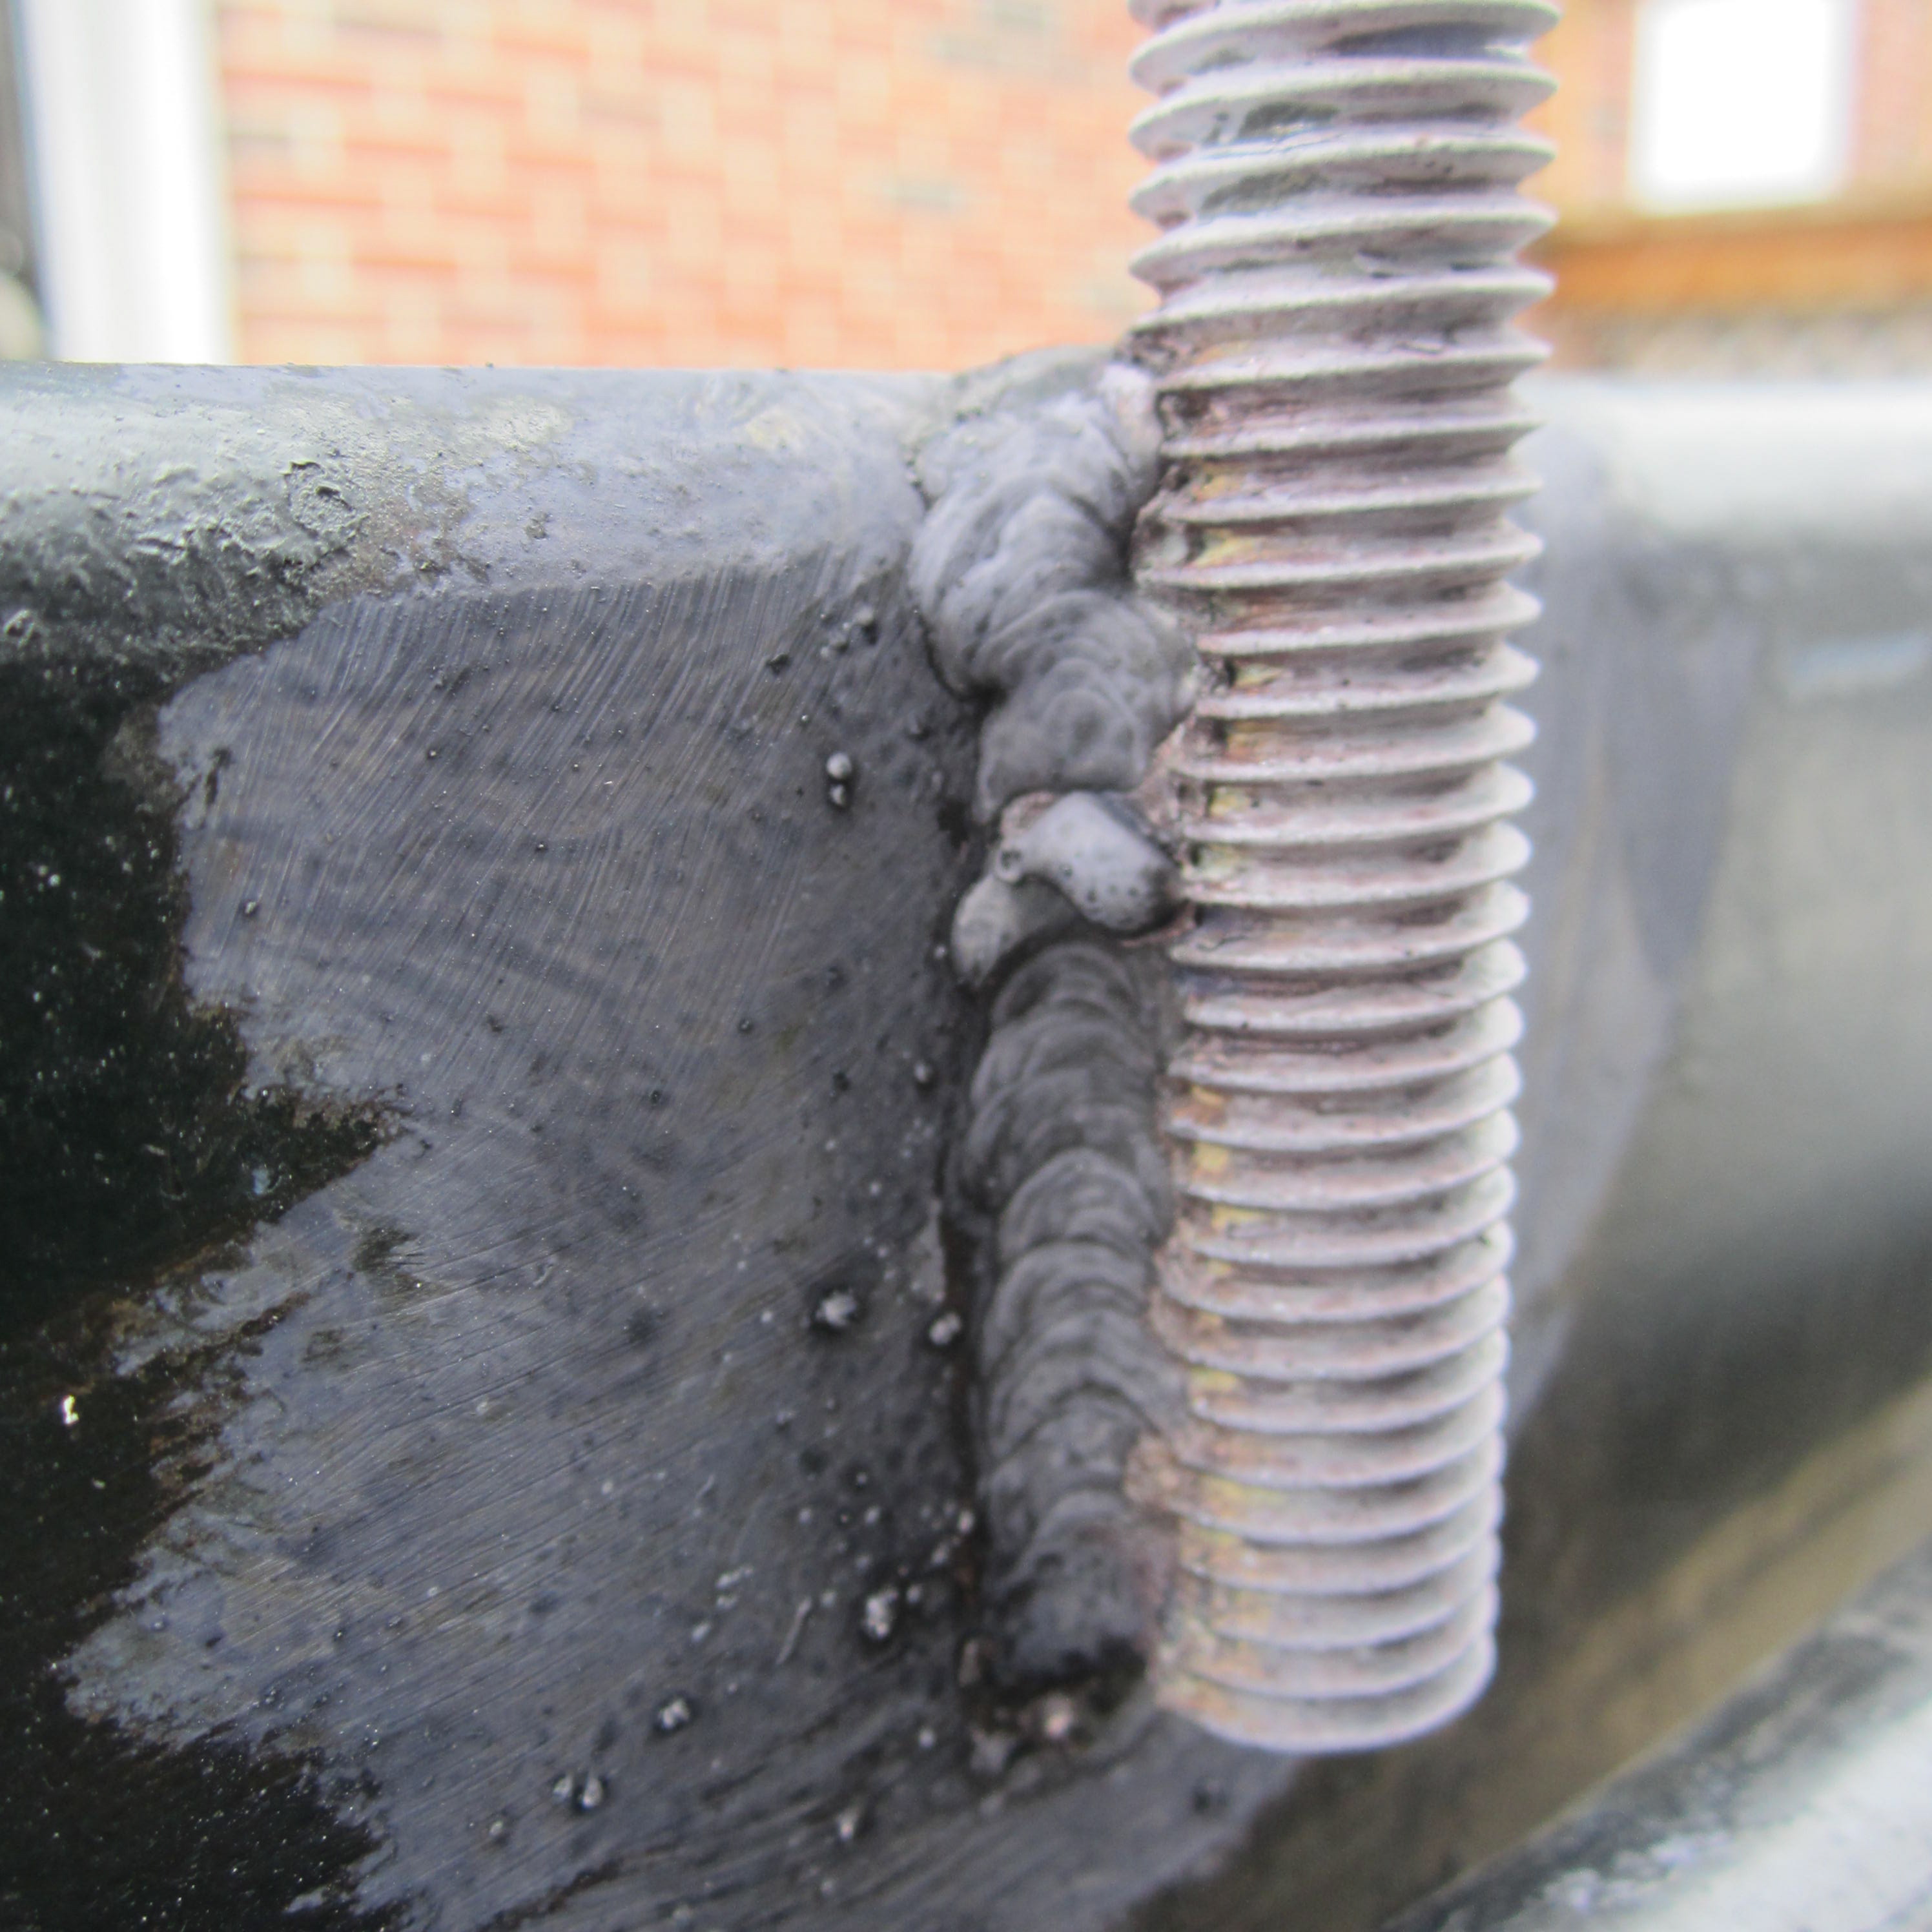
Ugly but Strong Welds

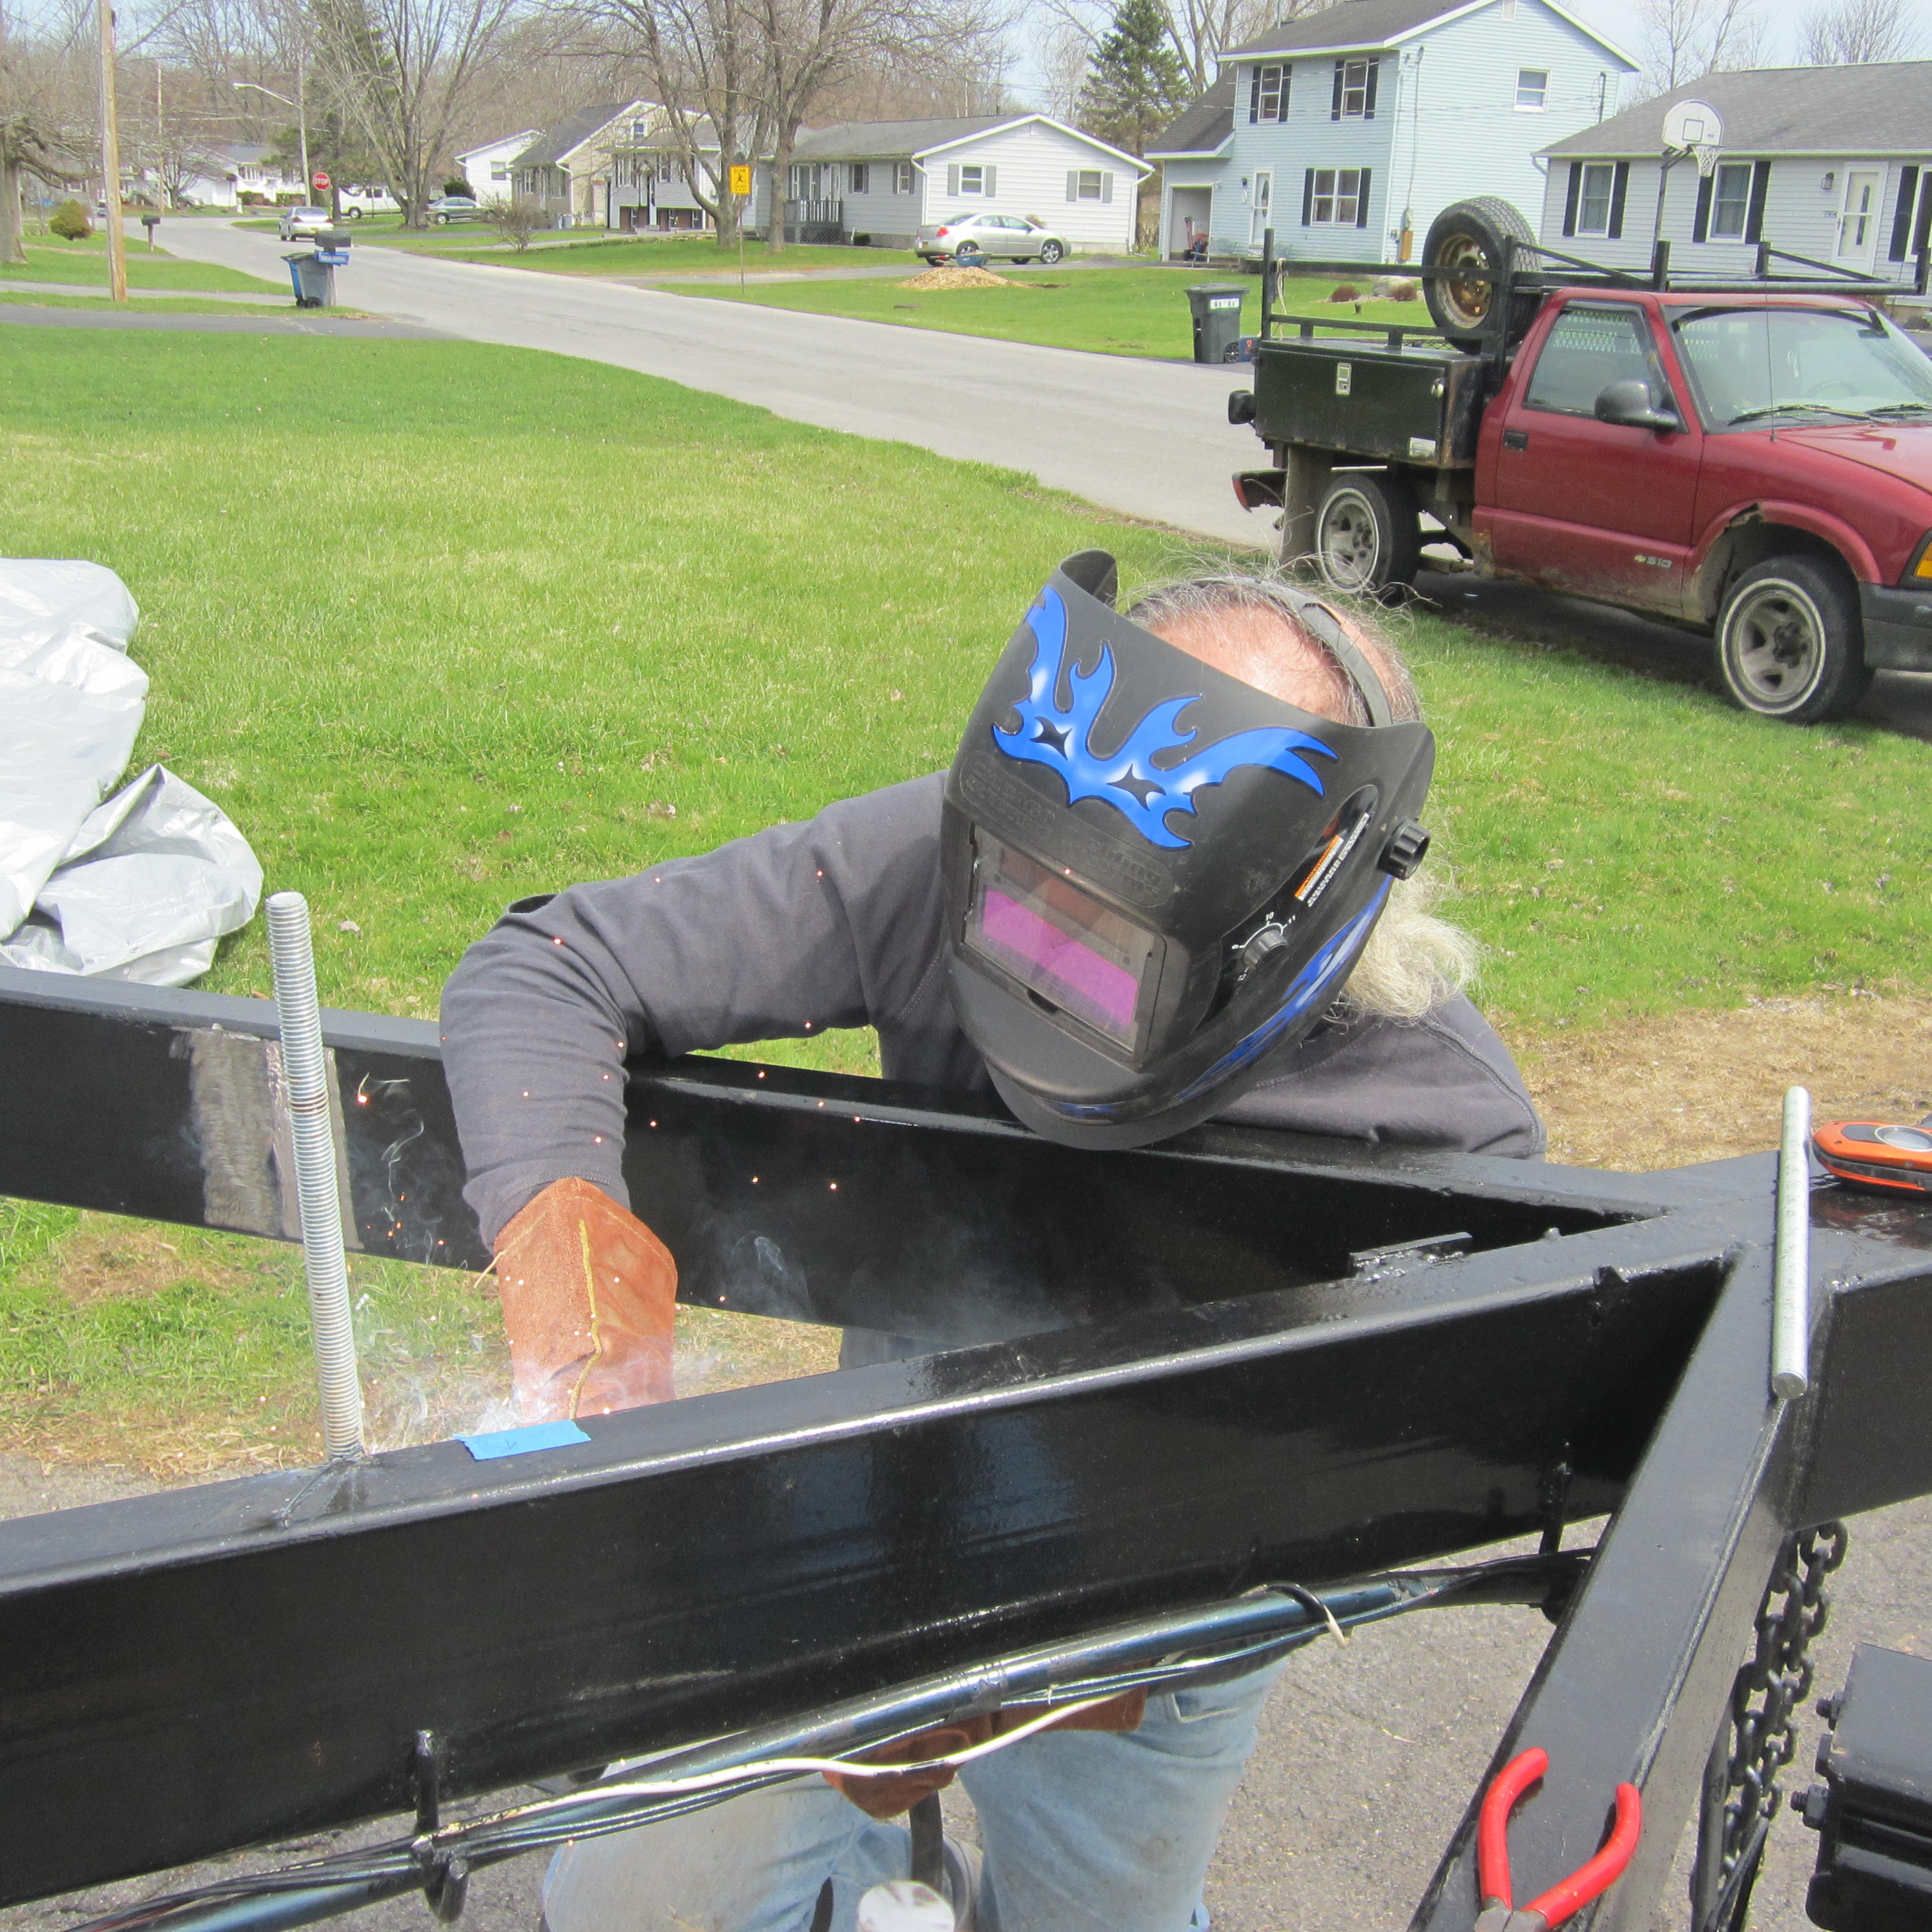
Pa started off welding the first side of the trailer. He owned the welder and had a little experience.  He’d weld a small bead at the top and bottom while I held the rod in place. Then, he’d start filling in the entire length (my overkill request). His initial welds were pretty ugly tumors; sorry Pa. This was because we didn’t have a high enough setting on the wire feed for the large gaps we had to fill in. Also, Pa didn’t really get the welding gun in close enough for that nice consistent bacon sizzle. We’ll place the blame on his glasses. Regardless of looks, we banged on them with a lot of force with the sledge hammer–they weren’t budging or going anywhere! Success!

Tumor Welds
Tumor Welds
Tumor Style Welding Contiunes
Perfect Tumor Welding..
Wow. Our welds are ugly.
Wow. Pa won’t be getting any beauty points.

Round 2: Just Me and the MIG

We didn’t finish all of the welds on day one because it started to rain. On day two, it was just me. Before I got started, I noticed that surface rust already started to form on the bare metal areas. I should have applied a metal primer or the rust converter as a primer ASAP yesterday. Lesson learned.

Rust Already.
Rust Already.

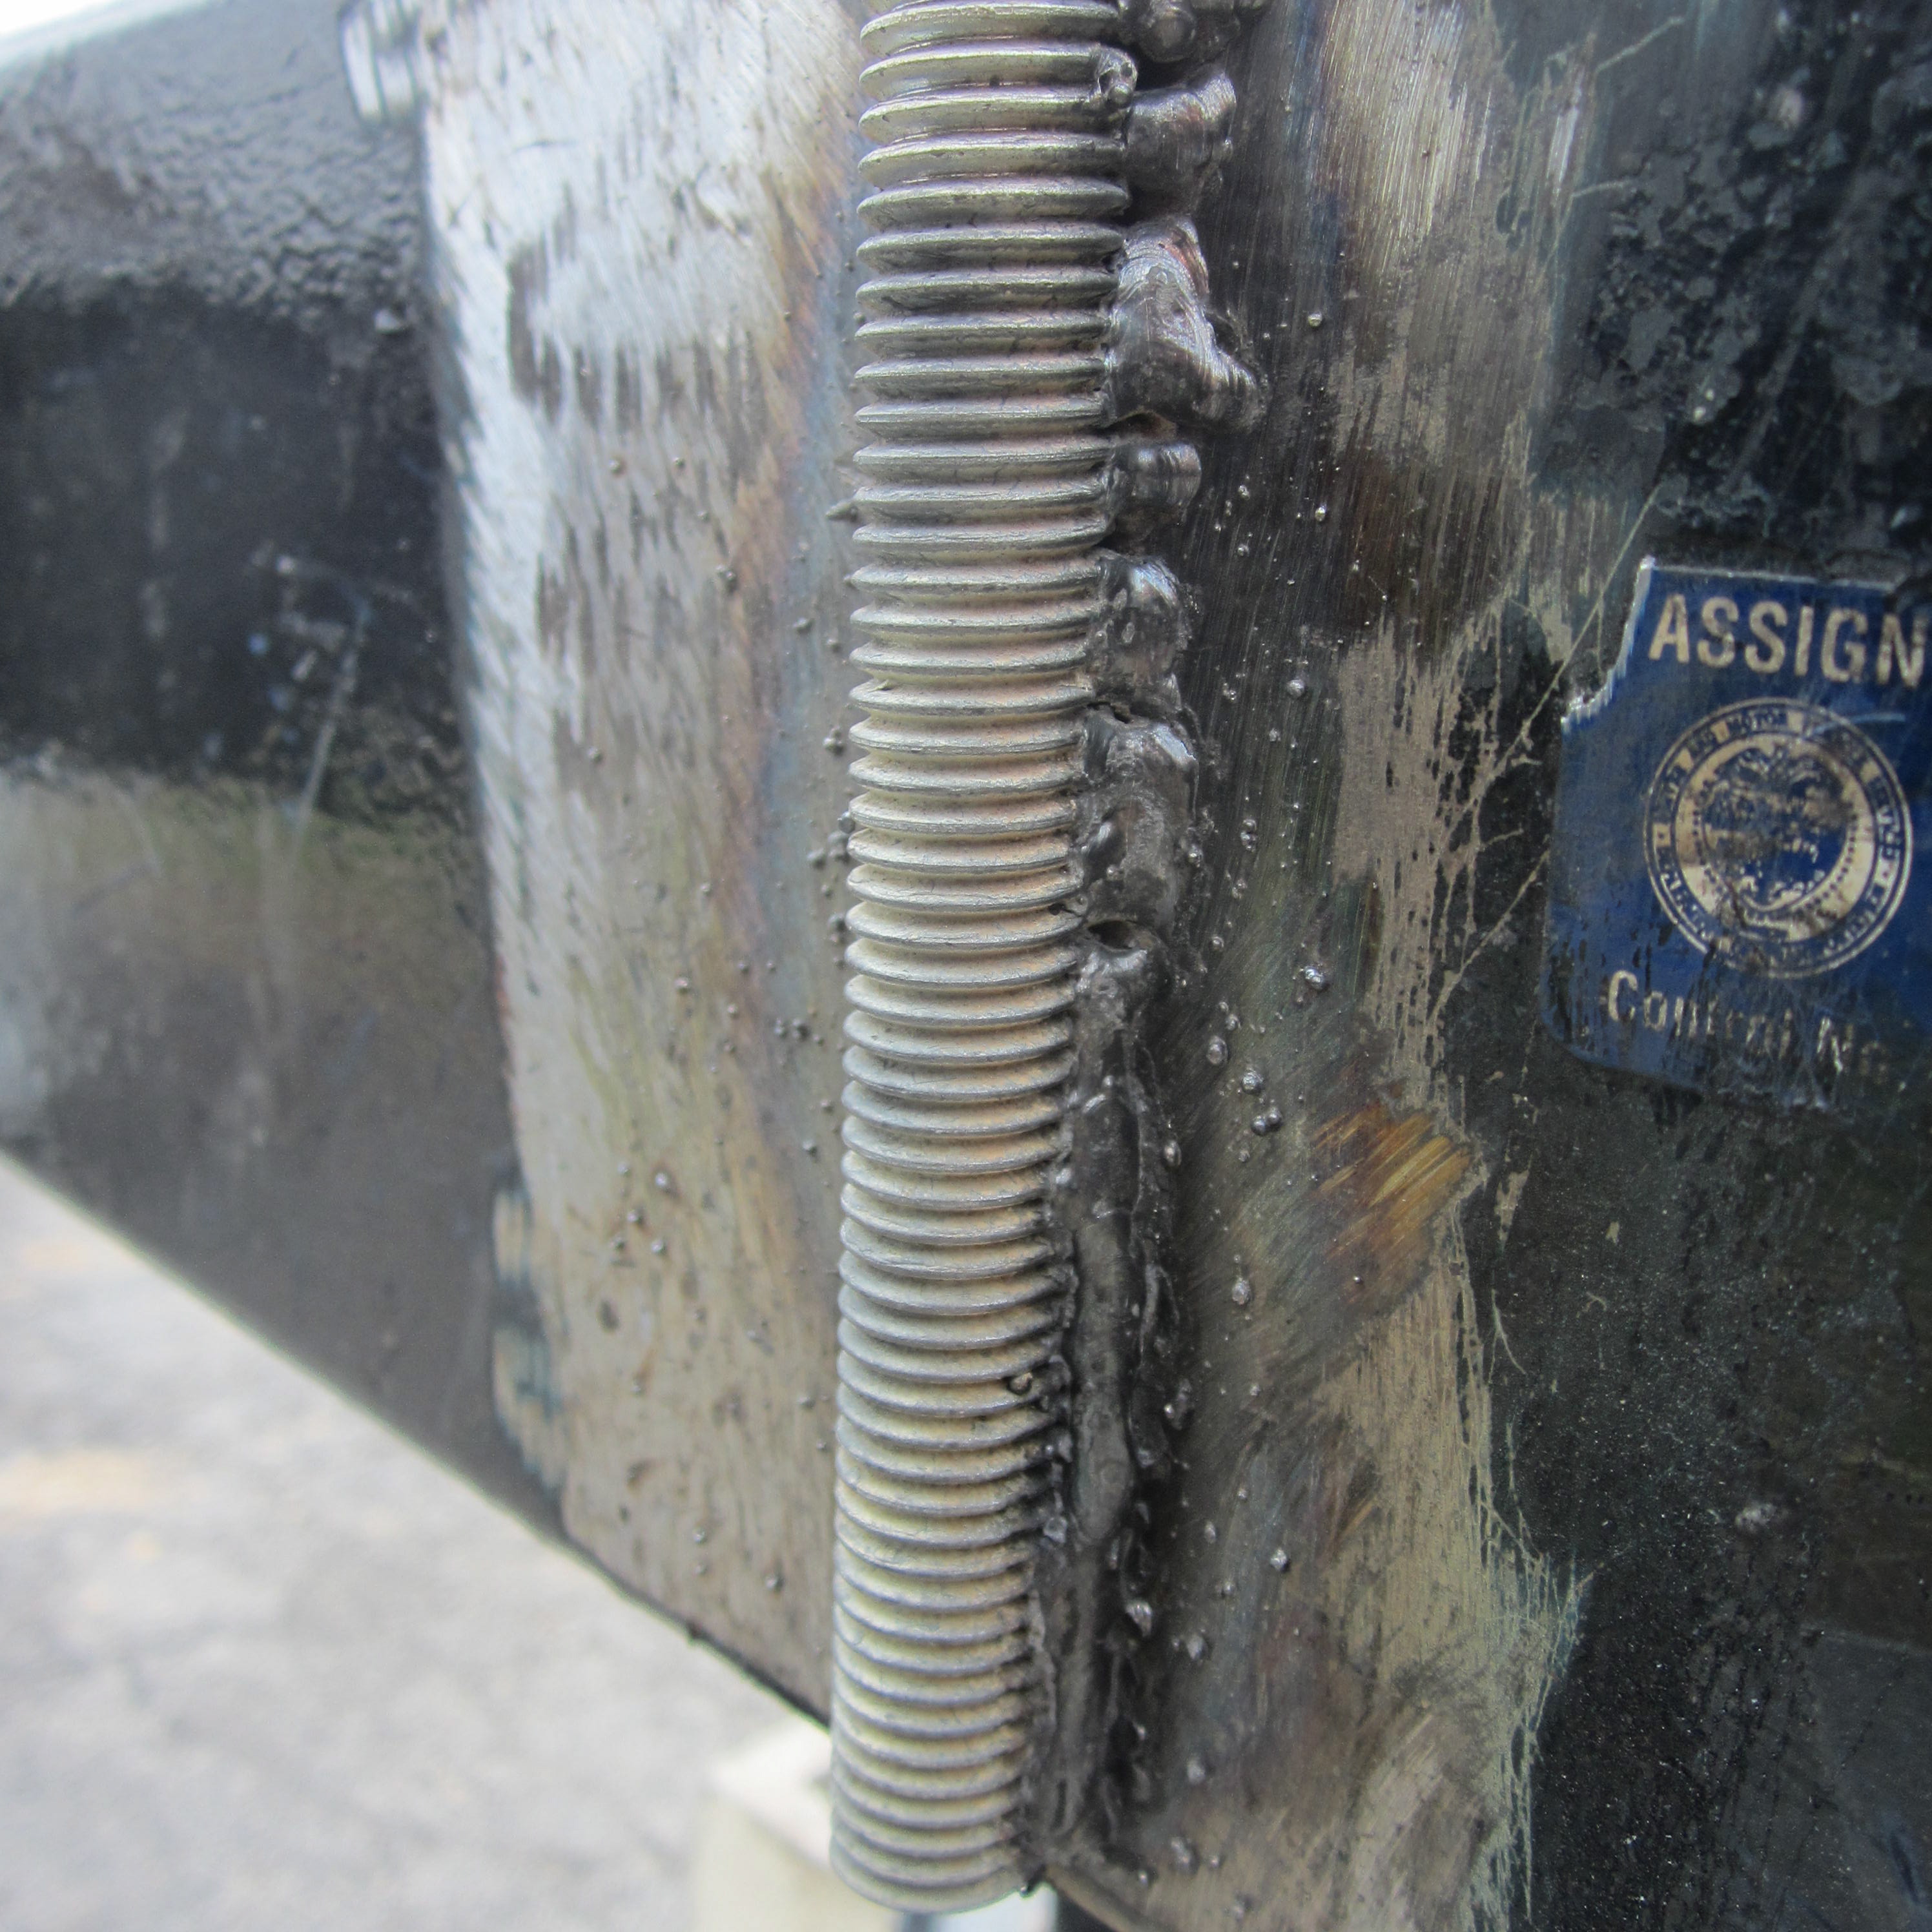
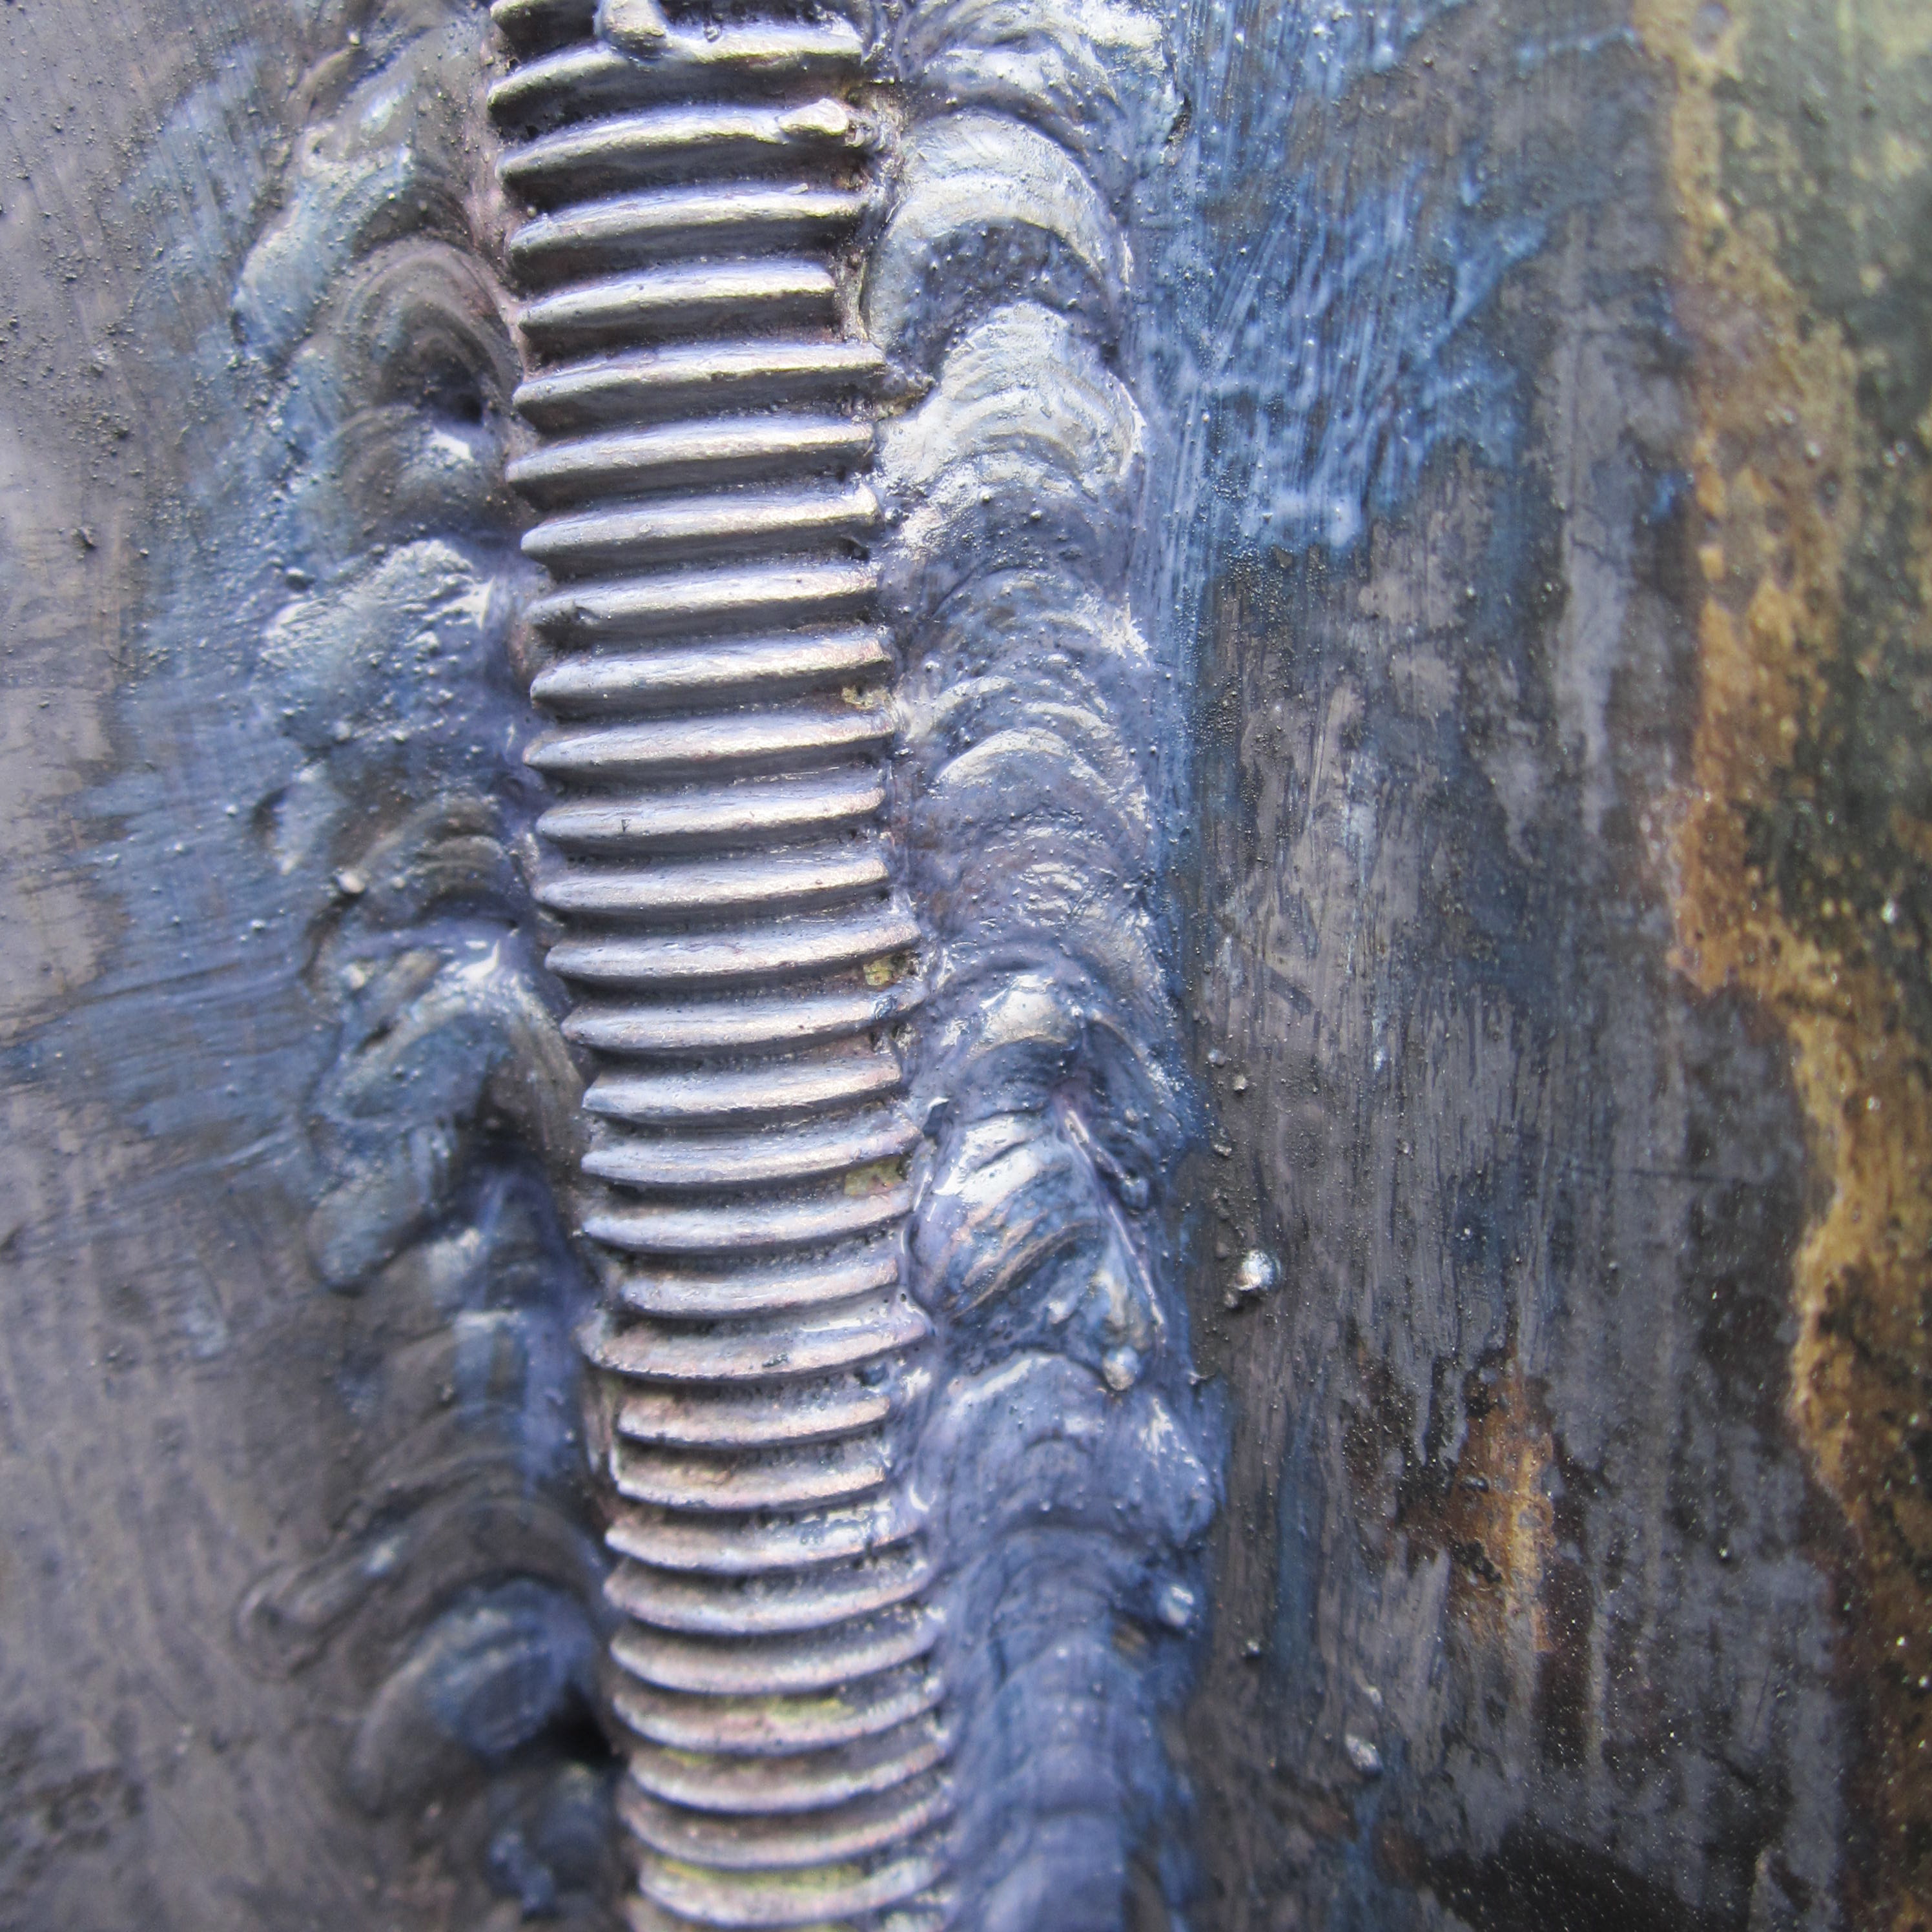
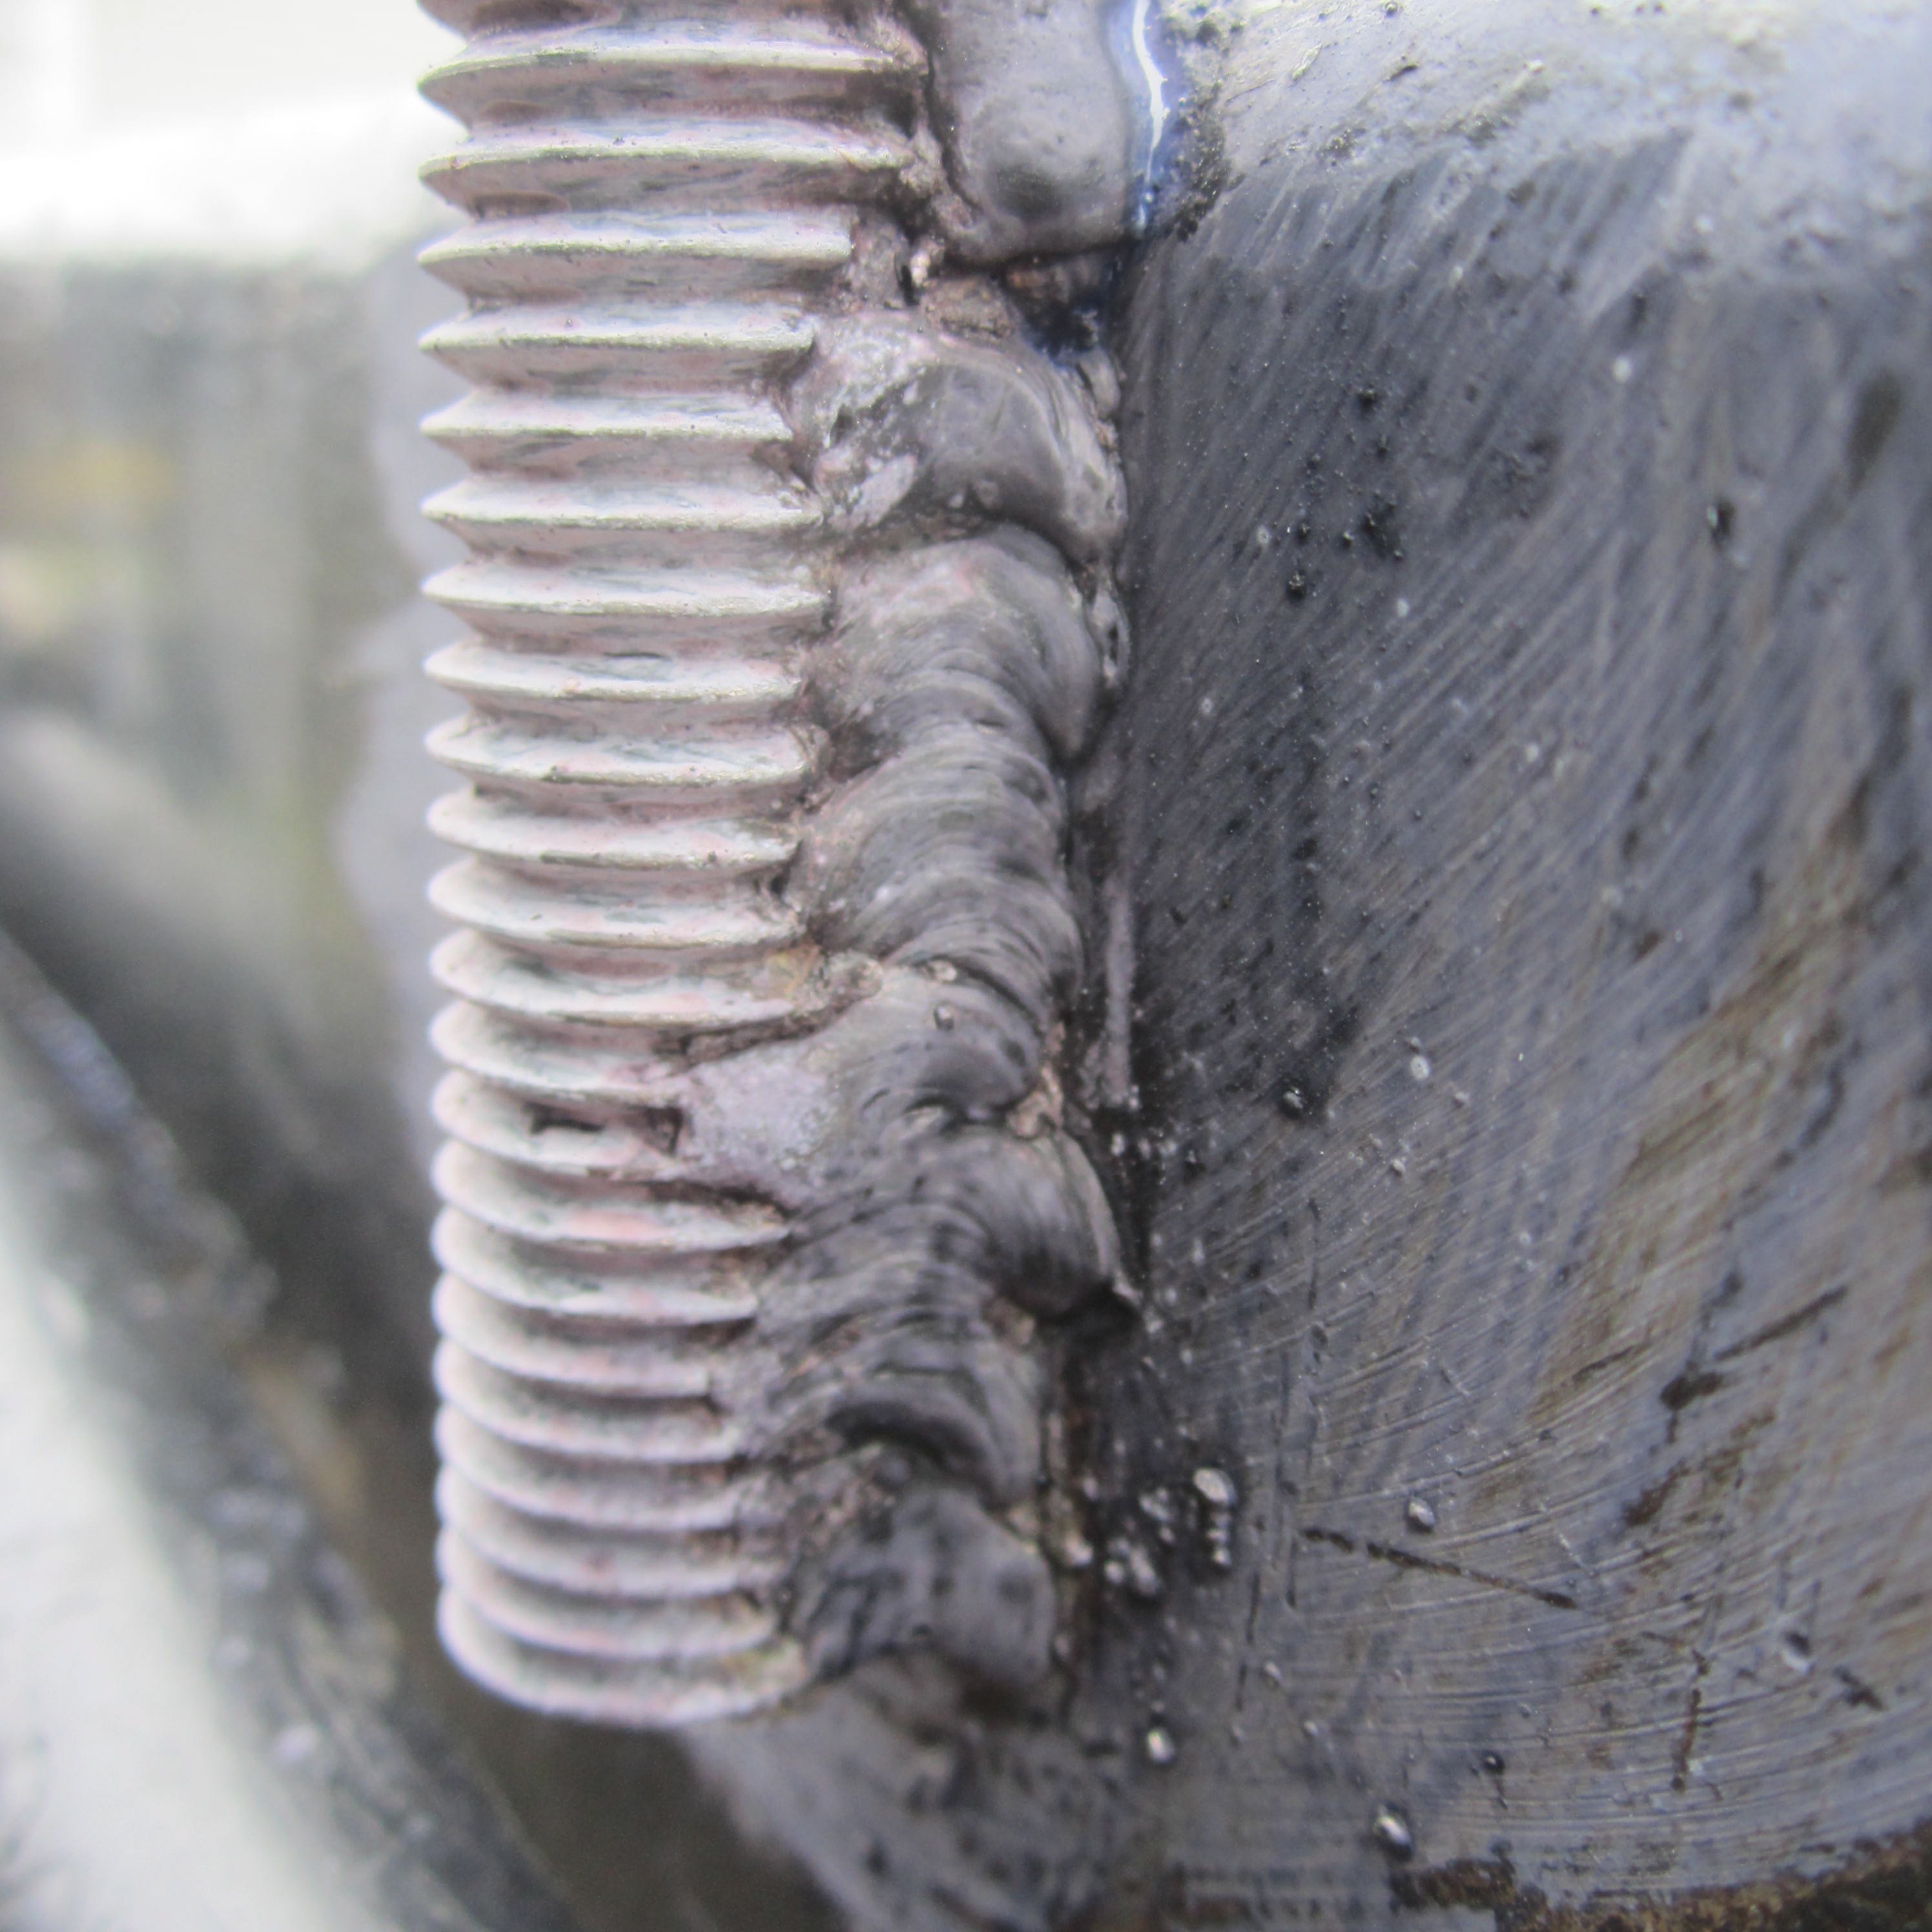
After cleaning off the rust and putting on the rust converter, my welding debut commenced.  I read through the welder’s manual, and I made sure I followed all of the safety steps. Definitely make sure to ground the welder with the clamp. We would use the previous bare metal bolt to do this (a painted surface could weaken the ground connection).  I held the rod myself and got some beads on it. I found that if I got the needle closer and slowly weaved left to right, I could get some less ugly welds. I felt a little giddy during the process! I didn’t have to hire a welder and picked up a new skill. I hope to weld some furniture legs in the future (you can always grind down those ugly welds!). Don’t forget to prime and paint the new bolts! Here were some of my less ugly welds:

IMG_2577
Not as ugly welds.
IMG_2575
Not too shabby.
IMG_2574
A Welding Machine

The reins are ours,

Chris

Reflections, Hindsight, and Alterations:

  • It’s really helpful to reach out and see if you have any friends who can weld.
  • If you don’t want to invest in the welder or can’t find one to borrow, cut the threaded rod with an angle grinder with a metal cut-off blade. Having the rods prepared will cut down the cost of having a welder come over.
  • After placing the steel hold-downs over the rods, I ran into some issues. Because the rod wasn’t in the center of my sill plate, some hold-downs would stick out slightly beyond the thickness of the wall. I could either grind down the hold-downs or just carve the back of my pine siding to make it work.
  • One rod was in the middle of our door! I put a nut on the bolt and shaved the rest of the rod off. I was able to carve a piece out of the bottom of the door frame to fit it over the nutted bolt, allowing me to utilize that bolt to help me at least hold the subfloor to the trailer at that point.
  • Between a lot of welding overkill along the 6″ steel tubing and cutting off 2-3 inches at the top– I wasted a lot of threaded rod. Shit. Should have just welded 3-4 inches along the frame and trusted my measurements to and above the sill plate. Don’t forget to add the Simpson Steel Hold-down built-in washer and height of the nut. I’d add an inch of wiggle room beyond that get more.


Categories: Building, Uncategorized

Tiny House Subfloor Design: Bottom Up! Subfloor Evolutions

Initial Conversations

“Yack, yack, yack,” said the subfloor generic lipitor.
“Wait a minute. What do you mean?” responded Chris.
“Bolts, maybe.”
“Maybe?”
“Sure.”
“Have you heard of steel hold downs? What are they?”
“Ya, ya, all the time. They’re steel. They hold down stuff, ya idgit.”
“I give up.” Chris concluded.

Thermodynamic Obscenities

Common sensibly, fastening your house to the trailer needs to be well engineered and figured out.  After consulting countless tiny house builders’ experiences, I found 2cycle2gther’s article and the Tiny House Blog’s Phase 1: Subfloor Sandwich System to be extremely helpful.  Although we wanted to incorporate that precious 6 inch space between the steel trailer’s framing members, Michelle, a building science graduate student, informed me that steel framing (studs) destroy your insulating capacities where you’d want it: under your toes in the winter. Joe Lstiburek, building science guru, states, “insulating between steel studs is a thermodynamic obscenity.” Because there’s no way to fully enclose the trailer’s hitch from the elements, the trailer frame space wouldn’t be a part of our subfloor.

Redundancy Employed

Exemplifying redundancy, we’re combining an altered sandwich system with 2cycle2gether’s sheathing to trailer screwing as well as screwing the entire subfloor to the trailer with Teks #12 (wood to metal 2 3/4 inch screws). We will also weld 16 bolts to the trailer to hold down the sill plate and entire subfloor to the trailer.  No chances have been taken! Why choose some approaches when you can employ every single one?

Longest Sandwich Creation of My Life

Our Sandwich System
Our Sandwich System. Yum.

Bottom Bun: Galvanized Steel Flashing

The bottom bun of our subfloor is galvanized steel flashing (seemed like the stronger and better option than aluminum although it was a little more pricey). As I understand it, the flashing will keep out insects and provide some water protection. You can skip the flashing and paint the 3/4 inch plywood layer with a strong and nasty marine grade of paint…if you’re into nasty.  What’s strongly stated with flashing types is aluminum reacts poorly to the chemicals used in pressure treated lumber. Our bottom T&G 3/4 inch plywood is treated, so aluminum was a no go; however, galvanized steel isn’t flawless according to the web, so for safety, we used tar paper in-between the plywood and flashing.  As always, better safe than sorry.

More Steel!
More Steel!

Portobello Slider: 3/4 Inch T&G Plywood

The 3/4 inch tongue and groove provides a lot of structural integrity. Having it or one side of it treated supplies extra durability if water penetrates.

It fits!
3/4 Inch T&G Pressure Treated Plywood

Tomatoes and Pickles: Glulams and Foam

On top of the 3/4 inch plywood will be the framing of the subfloor. I will use homemade glulams and 2x4s and glue and screw them to the 3/4 inch plywood underneath. Additionally, 90 degree steel hold downs will secure everything to everything. Insulation will be foam boards–and all remaining seams will be spray foamed in. I’ll use 16 inch on center joists–this may be a waste of wood–but I’m playing all of my structural integrity cards.

Framing Style
Framing Style
No Decomposing Insulation

Top Bun: 1/2″ plywood

On top of the framing will be only 1/2 inch thick plywood. Because the insulation is rigid, 3/4 inch plywood on top wasn’t necessary. All seams and joints will be caulked or siliconed for top notch air sealing (one of the most important, if not the most, energy efficient measures for a house).  This plywood layer will be glued and screwed to the framing.

1/2 Inch CDX Plywood

Side of Chips: The Welded Threaded Rod

Choosing the way to bolt the trailer was stressful. We didn’t use bolts because our steel is 6 inches thick and the subfloor was 6 1/2 inches; buying 13 inch bolts would have been expensive; however, it’s a good way to prevent welding cost (unless you weld them yourself–threaded rod is cheaper). We placed the bolts in obvious spots: corners, near the wheel wells, and in-between those areas. We decided to weld the bolts (threaded rod) for added strength. We’ll use Simpson’s HTT5 hold downs with the bolts, so that’s a huge cost in itself. Although on a tight budget, these were the areas we wanted to spend our money.

Threaded Rod!
Threaded Rod!

Future post will have detailed specifics on each of these sandwich steps. Yum, yum.

The reins are ours,

Chris

Categories: Building, Design

Tiny House Lumber Calculation: Living in Lumber

Helicopter Lumberer

The lumber yard delivered our wood for free, but before they did we wondered, “Should we go and inspect every piece of wood and pick up the lumber?” Our answer was yes…until we decided no.  Because we’d have the option to return pieces of wood, we felt like it wasn’t necessary to inspect everything. As the lumber yard clerk assured me, “We don’t sell wood to have it returned.” That being said–horror lumber delivery stories are out there.

Figuring Out the Count

I used our Tiny Tack House plans to make adjustments and estimate all of the lumber that we’d need. Their plans list the amount of boards and sizes that you’d need, but we have changed a few things and our trailer/floor will be a different size (22 x 8.5 ft), so it was a little work to figure everything out. Obviously, it’s smart to add a few boards on to your total estimate, anticipating miscalculations and warped wood. Lumber yards could lend you a hand figuring everything out, too.

So many minute changes.

For our planned 22 x 8.5 ft trailer and house, our final lumber count was the following:

Lumber Cost

Construction phases and wood original estimates (these changed):

Wood Ballparking
Wood Ballparking

Zip System Contemplation

Sheathing Options: OSB, Zip Panels, Plywood

We considered using the Zip System for our wall and roof sheathing; it would have been $330 more up front. Although more expensive, people claim the system actually saves you money and time from wrapping your house. We will spend $150 on Grace: Ice and Shield roofing underlayment and $120 on our house-wrap. This means we’ll only save around $60, but yes, it will take more work to install the underlayment and house-wrap; however, we’ll ultimately have better roof protection; the Zip System claims to eliminate felt paper whereas we’ll have a strong sticky underlayment.

Zip Panel Cost

Toxicity, Zips, and Regrets

Although Oriented Strand Board (OSB/Zip Panels) are generally cheaper and structurally as durable as plywood, they have more glues that off-gas, so more formaldehyde would be seeping into your house.  This was the main reason we chose the less but still “formaldehydy” plywood. Although plywood is not perfect, it does handle moisture a lot better than OSB. Tiny House Builder Ryan Mitchell chose the Zip System for his house, so check out his reasoning here. Upon further discovery, I have found non-formaldehyde plywood by Purebond and other companies. Thankfully, less toxicity is becoming more popular.

Save to Splurge

Instead of buying 4x4s (expensive), we will be sistering 2x4s for stud uprights (putting two together with screws) and creating glulams for the subfloor’s perimeter (two 2x4s and a strip of plywood glued and screwed together). This saved us $180. We used this money to splurge and instead of using 2x4s for the loft beams, we’ll have beautiful 4×4 cedar beams ($250 more). What will your save to splurge ratio be?

Doug from Liverpool Lumber

Doug from Liverpool Lumber

The delivery of our lumber was an emotional stew; throw in excitement, nervousness, anticipation, and disbelief and you get these tiny house builders. Our house was truly in motion! Was our preparation enough? Is everything figured out? It doesn’t matter–time to build.

Why did you put me up here? I need to poop.
“This is all the wood? Wait, why did you put me up here? I need to poop.” Charlotte

Reflections, Hindsight, and Alterations:

  • Thank the tiny house gods I added ten extra 2x4x8s and a few 2x4x12s. We used them all and miss-cut a few.
  • Quite a few warped boards, but we found a place for them.
  • Had to buy another cedar beam for $78. Ouch.
Categories: Building, Design